Millennial Homeowner
What Is A Safe Room In A House? Do You Need One?
You + Sharing This = Us as Best Friends
, nsidermaSIf you’ve found yourself scratching your head, wondering what is a safe room in a house? If you’re considering building a safe room, also known as a “panic room,” you’ve come to the right place. In this article, we’ll provide a comprehensive overview of everything you need to know about safe rooms: their features, benefits, potential pitfalls, and how to go about building one.
We’ll also address some
... moreYou + Sharing This = Us as Best Friends
, nsidermaSIf you’ve found yourself scratching your head, wondering what is a safe room in a house? If you’re considering building a safe room, also known as a “panic room,” you’ve come to the right place. In this article, we’ll provide a comprehensive overview of everything you need to know about safe rooms: their features, benefits, potential pitfalls, and how to go about building one.
We’ll also address some of the most commonly asked questions about safe rooms. So, you can decide whether to include one of these rooms in your home. So let’s dive in and explore the world of safe rooms!
Â
What is a Safe Room in a House?
A safe room is a fortified room within a residential home or business that provides shelter from disasters of all sorts. They are strong enough to withstand abuse from natural disasters such as hurricanes and tornados. They are also hidden to protect their occupants from home invasion threats and terrorist attacks.
Also known as panic rooms (check out the movie with that name!), they are often equipped with communication equipment to contact police authorities. They may also have a first aid kit for emergencies (1).
Â
Features of a Safe Room
Â
Structural and Internal Features
Many structural and internal features of safe rooms promote safety and protection from harsh elements and unwanted terror attacks. An effective safe room is typically approved by FEMA standards (Federal Emergency Management Agency) and the ICC Standard 500 (International Code Council).
These guidelines are made to ensure the near-absolute protection of the safe room. They are made to withstand extreme weather and attacks from human threats such as thieves or terrorists. Most commonly, a safe room will be built with concrete walls that resist penetration from extreme winds and are typically bullet resistant.
A safe room can be likened to a castle’s keep from Medieval times, an even more fortified structure that stood inside the main castle (2). Serving the same purpose, a safe room is made as a backup if anything goes wrong. That isif the main castle, a.k.a your home, was under attack or compromised.
Of course, safe rooms have come a long way since Medieval times. Now they incorporate technology and communication equipment in line with our society. Rather than using castle stone walls, it’s far more common to see modern construction materials used to build a safe room’s foundational structure.
Related:Â
Â
Location and Equipment
You can put safe rooms in a hidden room within your home or as a separate entity close to your home. Common locations for safe rooms include behind household furniture or features like big mirrors, wide closets, and large bookcases.
The idea is to keep yourself, your family, and small children safe until the threat has blown over and it is safe to return to the main home.
There are also many perks, equipment, and technology to help you deal with potential threats to yourself and your family. For example, high-tech safe rooms often feature security cameras and alarm systems to help you monitor the situation outside. For more standard safe rooms, there will at least be a peephole for you to spy on the happenings directly outside the room.
Some other equipment you may find in a good-quality safe room include self-defense tools such as weapons or protective gear, e.g., bulletproof vests and helmets. You may also find gas masks and hazmat suits to deal with poisonous gases, radioactive fallout, or other dangerous chemicals.
It can also be handy to include a first aid kit for emergencies and a portable toilet in case you need to remain in the same room for long periods.
On that note, safe rooms often feature nonperishable foods such as canned stews and baked beans for survival purposes. You should also ensure a sufficient water supply for drinking, washing, and other related uses.
It’s also common to have multiple cell phones in the panic room. This is to ensure a source of communication for legal aid authorities is available. This can be for calling the police, ambulance, or fire brigade.
Â
Why You May Need a Safe Room
There are many reasons to have a safe room in your home. It can serve as a refuge from danger, or even just an extra guest room. Many people make their basement into a safe room, while others use it as a home office.
One reason to build a safe room is to protect against extreme weather events. These can include heavy rain, thunderstorms, flooding, and in some areas, bushfires. In the United States, strong winds and flying debris can also be a danger.
A safe room can be a good investment, especially as climate change leads to more frequent and severe natural disasters. When building a safe room to protect against these dangers, it is generally best to place it underground. This provides fewer access points than on the top floor of a two-story house.
In addition to natural disasters, there is also the risk of man-made dangers, such as political instability and civil unrest. Moreover, the interconnected nature of the world through digital technology means that global issues can have a more significant impact than ever before.
The recent war in Ukraine is an example of how missiles, bombs, and bullets can suddenly threaten even peaceful countries. A safe room can provide peace of mind for homeowners who worry about these threats. Although, it is important to assess the specific risks in your location to determine the level of protection you need.
Related: What is a Keeping Room?
Â
Risk Assessment
It is important to conduct a risk assessment when building a new home to understand the potential hazards in the location. Consider factors such as proximity to rivers, highways, and potentially hazardous structures like gas stations or power plants.
Other factors to consider include the area’s geography, such as the risk of bushfires or landslides in mountainous areas.
The type of safe room you build should be based on the threat your area is most prone to. For example, a family living in a storm surge area should consider building a large shelter. This could include strong concrete slab doors, walls, and reinforced ceilings to protect against heavy rainfall.
When assessing risks, it is essential to distinguish between true fear and phobias. A phobia is an individual’s perceived sense of danger based on personality complexities, while true fear is based on factual information that poses a legitimate threat.
It can be helpful to get a third-party opinion on the risks and threat levels of your home’s location before deciding on a design for a safe room.
Consider the ages, genders, maturity, and any disabilities or medical histories of family members when designing a safe room. For example, if you have a young child with asthma, a dust storm could be a serious threat, and a well-equipped safe room with tools like reliever puffers and resuscitation equipment may be necessary.
Other factors to consider include the amount of cash and other valuable assets you have that need to be kept safe. A safe room can provide an added layer of protection against home invasions. In addition, it can be beneficial if you or a family member is at risk of kidnapping for ransom, such as a professional athlete or high-profile politician.
Â
Pros of Safe Rooms
There are countless benefits to having a safe room in or around your home. However, here is a list of the major benefits you could experience with the new construction of a safe room.
Â
Protection from Threats
A safe room can protect your family if you live in an area at risk of encountering extreme weather conditions or even natural disasters. Unfortunately, hundreds of thousands of injuries and fatalities occur yearly due to elemental threats such as hurricanes, tornados, bushfires, and severe thunderstorms.
Many safe rooms are constructed to be wind-proof, fire-proof, and flood-proof. This provides existing homes with access to a safe shelter in the face of an imminent natural disaster.
A safe room may not protect your entire house, but it can protect what is most important to you. Compared to your family and loved ones, even your dream house is expendable, but some things cannot be replaced. Furthermore, a safe room allows you to take your most valuable possessions and keep them out of harm’s way in the event of a destructive threat.
Â
Peace of Mind
Some homes are at greater risk of a disaster than others. So chances are that your home may not necessarily be in a high-risk area. With that said, no one is 100% safe from a disaster or home invasion threat. So, having a safe room provides peace of mind that can help reduce stress levels, especially if a threat arises.
You may not necessarily use your safe room as a fallout shelter, but that doesn’t mean you can’t use it for other ventures.
Many homeowners turn their safe rooms into home offices, workout gyms, or even a “man cave” for friends. They are typically hidden rooms in or around the home. You can use a safe room to provide the necessary peace and quiet to get important work done or to have private conversations away from the kids.
Coupling the safe room with a reinforced door can prevent forced entry from unwanted intruders. In the worst case, a criminal or terrorist.
Â
Flexible Placement
The great thing about safe rooms is that they can be built anywhere, including on high elevated floor or ground-level floors. They can also be built as part of the home or in an outdoor space near your home, much like a granny flat or shed.
When building inside the home, you can opt to have your safe room hidden, such as behind a closet door or large bookshelf. This restricts access to outsiders who are unaware of its whereabouts.
Given the minimal requirements to build a safe room, it can easily be incorporated as part of your home. For example, if you have the space, you could create a whole new room in addition to your existing ones. Alternatively, you could turn one of your existing bedrooms or restrooms into a safe room with just a few structural and internal adjustments.
Â
Cons of Safe Rooms
Unfortunately, it’s not all sunshine and rainbows when building a safe room. There are a few cons you should consider before deciding. However, you should know a few main concerns when building your new panic room.
Â
May Be Complicated to Build
There are generally few issues when adding a safe room to an existing home. However, although its seldom impossible to construct one, it can still prove to be a complex process. This is because of the expensive and rare materials required to build a safe room.
Remember, these rooms are designed to be bullet resistant, wind-proof, and fire-proof. So, you should use only the strongest and most durable materials to construct the doors, walls, and ceilings.
If you are building a new home from scratch, including a safe room can prolong the duration of the construction work. However, special equipment, materials, and additional crew members may be required to install your new safe room. These extras will cost both time and money.
For these reasons, double-check your risk assessment and re-evaluate whether a safe room is necessary.
Â
Takes up house space
Another thing to consider is the amount of space a safe room will take up. This can be particularly disruptive for a large family and/or a small home. Thus, a safe room could be why certain family members need to bunk together when they easily could have had their own rooms.
If you have a family household with teenagers or young adults, depriving them of their own personal space could lead to unwanted family dramas.
Â
May never be used
This last point ties in with every con and amplifies them. It’s that you may never use your safe room. This is because some areas never experience threats from natural disasters or home invasions. The need to vacate the main home may never come up.
Considering all the other issues a safe room could introduce, it would all be “pain in vain” if it was never used.
Â
What is a safe room in a house FAQ
Â
What is the purpose of a safe room?
A safe room (or panic room) provides members of a household with a shelter in the case of an emergency. It is an escape route for families that protects from natural disasters and human-related attacks.
Â
Are safe rooms a good idea?
It depends on your circumstances and level of risk in your area. However, safe rooms can be a fantastic idea for providing protection and safety from dangerous threats, disasters, and hazards.
Â
Can a bathroom be a safe room?
A bathroom in and of itself cannot be a safe room, but it can certainly undergo construction to become a safe room. Many safe rooms contain a portable bathroom, nonperishable foods, and water supply for long-term survival.
Â
Sources
(1) – https://www.redcross.org/get-help/how-to-prepare-for-emergencies/anatomy-of-a-first-aid-kit.html
(2) – https://www.medievalchronicles.com/medieval-castles/medieval-castle-parts/medieval-castle-keep/
You + Sharing This = Us as Best Friends
lessHow To Cool Down A Room Fast? Find Out Here!
You + Sharing This = Us as Best Friends
The summer heat is getting hotter and can be unbearable, so it is essential to know how to cool down a room fast. You could turn that up to cool your entire home if you have air conditioning.
Not everyone has one, though, and not everyone wants the increase in energy usage and costs that come with it. There are quite a few strategies that you can use to cool a room without an air conditioner.
Reducing
... moreYou + Sharing This = Us as Best Friends
The summer heat is getting hotter and can be unbearable, so it is essential to know how to cool down a room fast. You could turn that up to cool your entire home if you have air conditioning.
Not everyone has one, though, and not everyone wants the increase in energy usage and costs that come with it. There are quite a few strategies that you can use to cool a room without an air conditioner.
Â
Reducing the hot air sources in your home
When the heat is unbearable, keeping your home cool and comfortable can be difficult. There are several ways that you can quickly cool a room. An air conditioner is an efficient way to keep your home at a comfortable temperature, but it is not energy efficient, and not everyone has one.
If you do not have a central air system, investing in a good portable air conditioner can be a great way to keep a room cool, but this still does not come with energy efficiency. Fans can help circulate the air and make the room feel cooler.
Closing blinds with insulated curtains can block out the heat from the room. These are, of course, the most apparent suggestions, but there are other effective ways to cool the room if these are not cutting it.
Whether you are combatting a heat wave or just trying to lower your energy bill, the three things you want to focus on for cooling your room is reducing heat, air circulating, and cooling. These are a few tricks to cool down your entire house or, at the very least, your main room.
Before anything else, you should look for ways to stop the indoor temperature from increasing due to the heat generated inside. When it is unbearable outside, you will want to make sure that everything indoors is not adding to it.
Related: What Is The Temperature In My House?Â
Â
Light bulbs
During the heat of the day, it is best to keep the lights dimmed or even off if possible to keep your room cooler. Lights put out some heat, so this is a helpful way to limit extra heat from making the room even more unbearable.
Additionally, switching your incandescent lights with LED bulbs can help if you have not already (1). LED bulbs use significantly less energy than incandescent bulbs and emit less heat. This makes it a more sustainable and cost-effective solution for the long term.
Â
Curtains, Blinds and Shades
Make sure to cover windows during the day. Shutting the curtains, blinds, or shades can help to keep the sun’s heat from entering the room. The thick, heavy fabric of window coverings can block out direct sunlight, allowing the inside of the room to stay cooler.
Â
Minimize use of heat-generating appliances and electronics
Minimizing your use of appliances that generate heat, especially during the hottest part of the day, can prevent it from contributing any hot air to the room. You will especially want to avoid using appliances like the oven, washer & dryer, or dishwasher.
Try washing the dishes by hand or hanging wet clothes up to dry. If you must use one of these, shut the door if possible to trap heat and keep the rest of your home cool.
You will also want to avoid taking a steamy shower, because excess humidity can increase the stagnant, hot air. If you do shower, take one in cool water, turn on the bathroom fan, and keep the door shut. This will help to keep the humidity from spreading throughout the home, plus the cool water will help to cool you down.
You might consider using a microwave or pressure cooker to prepare your meals. These types of appliances generate less heat and are more efficient than the oven and stove. A small appliance like a pressure cooker or electric skillet can prep a hot meal without adding heat to the room. Alternatively, you could eat a no-cook meal like a freshly-prepared salad or sandwich.
Â
Unplug unused electronics
Unplugging unused electronics is an effective yet often overlooked method of reducing heat sources in your home. Your electronics still generate heat when plugged in, even if they are not currently in use.
You should consider turning certain high heat-generating electronics off during an extreme heat wave. Things like televisions and computers emit a lot of heat when in use, which can cause the room to heat up more. Keeping these turned off, and unplugged can keep the room from becoming even more insufferable.
Â
Doors and Windows
If you open windows and doors, allowing fresh air, you can help circulate the air and cool down your home. Especially if you set up tower fans to take advantage the cross breeze. At night, remove the window coverings to allow the cooler night air inside.
As the cool air flows through the room, it can relieve the oppressive heat and make you feel cooler. This is especially effective at night when you do not have to deal with the rays of the sun, which can quickly heat up a room.
Â
Circulating cool air
One of the most obvious solutions is more fans. Using window fans, ceiling fans, box fans, or tower fans is a practical way to move the surrounding air and help you to feel cooler.Â
Although fans do not directly cool the room, they cool you by creating a wind chill effect. The fan blows the air around you, allowing the moving air to evaporate the sweat from your skin. This process helps to eliminate some of your body heat, making you feel cooler.
If you have a ceiling fan, make sure it is on a higher setting and rotating counterclockwise. Even though hot air rises, when ceiling fans push it straight down, it can create a wind chill effect. This feels like cool air and helps your sweat evaporate.
Putting in window fans can draw in the night’s cool breeze. It is especially effective if you have another one in an opposite window facing out to create a makeshift cross breeze. Keep all interior doors open, so you do not prevent cool air from moving throughout.
Turn on your exhaust fans in your bathrooms and kitchen (even if you are not currently using either space). An exhaust fan draws the hot air and humidity out of your house. Turning them on during the hot summer months can help reduce the hot, humid air and keep your home cooler.
This is important if you live in a humid climate, but can be helpful in any climate (2). If there is a lot of humidity, you can even create your own by pointing window fans out to force the inside air out. In the future, you might also consider investing in a dehumidifier to help remove any extra humidity as well.Â
Even if you have an air conditioning system, fans can help circulate the cold air and keep your AC unit from working too hard. Fans compliment the system to keep the home at a comfortable temperature. For example, keeping a ceiling fan and tower fan on can make the room feel cooler, so you won’t have to crank the air conditioning as low.
Â
Working with your home
Work with your home’s design rather than against it. If you have a basement, place a box fan there draw up some cooler air. Set up oscillating fans throughout your home to keep the air moving. Make sure that your ceiling fans are turned on wherever they are.
Stagnant air can feel stifling and keep you from cooling off. If your home has multiple levels, try to focus your energy on the lowest level, since heat rises and this level should stay relatively cooler.
Increasing your home’s air circulation using fans, open windows, open doors, etc. is key to keeping the inside more comfortable.
Â
Stay cooler- controlling the warm air
During extreme heat waves, you never want to be stuck in the heat without a way to cool off. Hot summer days can be uncomfortable, but it also can be extremely dangerous. It is important to take all the necessary precautions to stay cool.
To prevent heat sickness, you want to be mindful of how you feel, stay hydrated, and keep your body temperature down. Here are some tips for how you and your family can beat the heat and stay comfortable.
Â
Stay hydrated
Staying hydrated is essential in hot temperatures. Drinking plenty of water throughout the day to ensure your body remains cool and to replace any fluids lost due to sweating.
You will want to drink mostly water and non-alcoholic drinks to replenish any lost fluids. Both caffeinated and alcoholic drinks should be limited or avoided completely, as both can lead to further hydration. There is not a specific amount of water that you will want to drink, but trying to drink throughout the day and especially whenever you are thirsty is a good rule of thumb.
Â
Stay inside in the cooler air
In the early morning and at night, open up the windows on the opposite side of your house or apartment. This will create a cross breeze to help circulate the air and create a cooler atmosphere inside.
If possible, stay indoors during the hottest part of the day. At this point, you will want to close the windows and curtains to keep the sunlight out and stop it from heating up the room again. If you notice a window with heat coming through it, you should add a layer of insulation (like a blanket or window film) to prevent heat gain.
Â
Dress for the weather
Be mindful of what you wear. In order to stay comfortable and cool, you will want to dress accordingly. It might be tempting wear less or tight clothing, but this can feel restricting or sticky. You should choose lightweight, cotton fabrics that won’t trap in your body heat and will let air circulate.
A loose, relaxed fit won’t restrict your movement and helps you to regulate your temperature by allowing optimal airflow. You should also avoid dark colors because they absorb heat making you feel warmer.
Â
DIY Air Circulation
An air conditioning unit is one of the best ways to cool down a room quickly. Installing an AC unit in your window or using a portable air conditioner are great alternatives to a full air conditioner system.
Investing in either option would be an easy way to get and keep your room at a more comfortable temperature. It is especially effective if you only need one room or small space to be cooler.
Window units are easy to install depending on the size and shape of your window. And portable units are even simpler, with many just needing to be plugged in.
You can even make your own DIY air conditioner to create cold air that can keep you cooler. You can set this up by placing a bowl or pan filled with ice in front of a desk or tower fan and point it directly at you.
The ice, cold water will slowly evaporate and lower the temperature of the air, allowing the fan to blow cold air across you. You could even use ice packs or a bag of frozen peas to create the same effect.
Or sit in front of a fan or directly below a ceiling fan. Although it does not get rid of the warm air, this breeze helps any sweat to evaporate and cools you down with the wind chill effect. It feels like you are tricking your brain into thinking it is cold, but you are just activating your body’s way of regulating your temperature.
As tempting as it sounds, do not use your refrigerator or freezer as a makeshift air conditioner. These work by sending excess heat out the back, so overall they will only heat your home.
Â
Regulating your temperature
It can be challenging to get yourself cooled down in summer heat. Use ice packs. You can place them on your couch or bed to keep it cooler while you relax. Or you can apply it directly to your pulse points, like your wrists or neck.
By focusing on the pulse points, the ice cools you down quickly. You can use almost anything frozen – an ice pack, bag of ice, or even a frozen bag of vegetables.
Take a quick, cold shower. Humidity does increase the oppressiveness of hot air, but a quick, cold shower or bath can be a great way to cool down and relax. Plus, the cold water can help lower your body’s temperature.
Related: What is a cold room in a house? Do you need one?
Â
How to cool down a room fast FAQ
Â
What is the fastest way to cool down a hot room?
To cool a hot room quickly, you should:
Related: How To Fix A Hot Room In A House? Find Out Here!
Â
Conclusion
Heat waves can be incredibly uncomfortable and potentially even life-threatening, so it is important to take all necessary precautions to keep you and your room cool. Here’s how to avoid overheating through some hot nights.
The three areas that you want to focus on for cooling your home is stop any heat leakage at the source, circulate the air throughout the home, and finding ways to cool down and stay comfortable.
Make sure to avoid using major appliances/electronics and block out the sunlight during the hottest part of the day. When the sun is down, open the windows throughout your home to help draw in cooler air and create a breeze. Ensure all your fans are turned on to help circulate the air.
Your biggest focus should be on regulating your body’s temperature to avoid heat sickness or dehydration. Staying hydrated is important, as drinking lots of fluids can help replenish anything lost through sweating. Additionally, things like sitting under a ceiling fan or take a cool shower can be great ways to quickly cool off.
There are plenty of strategies to cool your room and keep it comfortable during hot summer days. Some might require a bit more preparation and effort, but most are simple and quick so you can quickly beat the heat. Â
Sources
(1) – https://www.energystar.gov/products/lighting_fans/light_bulbs/learn_about_led_bulbs
(2) – https://education.nationalgeographic.org/resource/humidity
You + Sharing This = Us as Best Friends
lessWhat To Do With An Extra Room In The House
You + Sharing This = Us as Best Friends
It can be challenging to organize a small space if you have too much stuff. Conversely, it can be difficult for those with more room than they need to decide how best to organize and take advantage of the additional space. That’s why we’re looking at what to do with an extra room in the house.
Making the most of an area with bigger dimensions is an opportunity to organize in a way that suits individual habits and lifestyle
... moreYou + Sharing This = Us as Best Friends
It can be challenging to organize a small space if you have too much stuff. Conversely, it can be difficult for those with more room than they need to decide how best to organize and take advantage of the additional space. That’s why we’re looking at what to do with an extra room in the house.
Making the most of an area with bigger dimensions is an opportunity to organize in a way that suits individual habits and lifestyle preferences while still efficiently using the available resources. The possibilities are limitless, so it pays to research ideas and explores various methods.
With this approach, one may find that having too much space can be just as easy to organize as having too little.
Â
Tips for Putting Extra Room to Good Use
Don’t let your budget go to waste! Don’t pay for the square footage you’re not utilizing; if a room takes up more space than necessary, it’s time to use that unused potential.
There are a few things that you can do to maximize these spaces:
By thinking creatively and considering your needs, you can transform an extra room into a functional and beautiful space that adds value to your home.
Â
Turn a Spare Bedroom Into Guest Room
Some simple changes can transform a spare bedroom into an inviting guest room. Begin by cleaning and decluttering the room to make sure it is inviting to guests.
Selecting a comfortable mattress is key for any bedroom, so find one that will give your guests a good night’s rest. Knowing the available space is necessary when deciding what furniture to include in the guest room.
If room permits, a dresser, and nightstand are great additions, with spare bedding stored inside the drawers. Include some wall art and framed family photos on the walls to create a warm and homey atmosphere.
Lastly, adding small touches like fresh flowers or plenty of spare pillows makes it feel like a special place for visitors.
Related: The Ultimate Guest Room Essentials List: 30+ Ideas To Make Their Stay Memorable
Â
Turn a Guest Bedroom Into Office Space
Transforming a guest bedroom into office space can be achieved in an organized and efficient manner with the right steps. To start, remove all pieces of furniture that are used for guest sleeping purposes. Remove linens, pillows, and any decorations designed to give it a homey feel.
Once you have cleared out the guest room, determine what type you would like to create. Decide which items you need to make it become a functional workspace; desks, chairs, organization systems, etc.
After you know what supplies you need to assemble your new space, paint the walls with neutral colors. This will help release stress while creating a professional environment.
Finally, furnish the room with quality furniture, desktop accessories, and organizational pieces to maximize productivity within your new workspace. With these simple steps combined together, anyone can securely turn it into a professional and comfortable space.
Â
Turn Your Attic into An Entertainment Space
To turn your attic into an entertainment space:
It is essential to repair your roof before converting your attic into usable space, as a damaged roof can lead to leaks and other issues that can compromise the integrity and safety of the space.
In addition, proper attic ventilation is crucial for maintaining a comfortable and healthy living environment. A properly functioning roof can help to regulate the temperature and moisture levels in the attic, preventing mold growth and other issues (1).
Â
Best Spare Room Ideas in 2022
Â
Home Gym
If you have a busy schedule or don’t want to pay for a gym subscription, a home gym is what you need to maintain your health and remain active.
Repairing a garage door can be an important step in creating a home gym, as it can help to provide a safe and secure space for your workouts. A properly functioning garage door can help to keep out drafts, noise, and pests, making it easier to focus on your exercise routine.
In addition, a repaired garage door can help improve your home’s overall appearance, increasing its value and curb appeal. Finally, a repaired garage door can provide an added security layer, helping protect your home and belongings while you are away.
Related: Home Improvement Ideas For Sports EnthusiastsÂ
Â
Entertainment Room
Create additional communal areas that you can use with your family or entertain guests. Build a home movie theater, a playroom for the kids, or a gaming area.
Avoid unused spaces in your home when buying an existing home, be sure to assess how much space is.
Â
Reading Room
You can transform your spare room into a meditation and reading room. Incorporate whatever hobby helps you decompress into your extra room.
Make the room a cozy place to relax. Comfy chairs and floor cushions are a simple way to make a comfortable place for reading or meditation.
Â
Game Room
If you think of setting up a dedicated game room, you may furnish it with cozy chairs and an expansive table.
Are you an enthusiastic gamer? Set up a console corner with beanbag chairs.
Â
Kids Playroom
You can set up a multi-purpose space that can serve as a kids’ playroom, craft room, or whatever else your family might need. Invest in kid-friendly furniture and fun activities to keep the little ones entertained.
Â
Dressing Room
If you are tight on closet space and need a place to store your clothes, consider turning your spare room into a dressing room. You can use the extra space to set up a vanity and hang racks for your clothes.
With this setup, you’ll always have plenty of room to keep your wardrobe organized. Whatever purpose you choose for your spare room, create a comfortable and functional space you can use and enjoy.
Â
Music Room
What’s more relaxing than listening to music at home? If you love playing or listening to your favorite tunes, consider turning your spare room into a dedicated music room.
You can set up a soundproof space for practice and an area for storing all your musical instruments and accessories. With the right setup, you can create the perfect listening space for your favorite tunes and enjoy some sweet music while you read or watch TV.
Â
Family Room
Whichever spare room you choose to turn into your new family room, the most important thing is that it is a space you can all enjoy.
Whether you want to set up an extra communal area for the kids to play or a comfortable and relaxing space where you can all hang out as a family, be sure to create a functional space. Whichever spare room you choose, make it an inviting and comfortable space that is perfect for your family needs.
Â
Meditation Room
If you want to create a calming and peaceful atmosphere in your spare room, you can start by decluttering and organizing the room, so it’s free of distractions. Add a comfortable floor cushion or chairs for long sessions, and arrange some candles to create a soothing ambiance.
Throw in some plants for a natural feel. Hang up posters related to your practice, such as calming images, mantras, or quotes.
Finally, dedicate space to store your yoga mat, prayer beads, or other meditation supplies. This will help motivate you whenever you come back to the room.
Â
Yoga Studio
To turn your basement into a yoga studio, clear out the space, add comfortable flooring and appropriate lighting, and consider investing in a few key pieces of equipment such as a yoga mat and blocks.
You may also want to include a designated space for relaxation and meditation, such as a comfortable chair or small altar. Finally, regularly clean and maintain the space to create a welcoming and peaceful environment for your practice.
Â
Multi-Purpose Room
To turn your spare room into a multi-purpose space, begin by decluttering the area. Next, think of spare room ideas that fit your needs.
Paint the walls to create an inviting atmosphere and add furniture pieces that are both functional and comfortable.
Lastly, incorporate accessories that personalize the space to make it feel like your own.
Â
Laundry Room
Whether you want to set up a dedicated laundry space in your extra room or add some storage shelves, create an organized and efficient setup that works for your family.
Start by decluttering the area and adding storage solutions essential pieces of equipment do you need for your laundry room? Some ideas include a washing machine, dryer, ironing board, and drying rack.
Once you have all the necessary equipment in place, organize it efficiently, saving space and making your laundry routine easier. Consider adding shelves or baskets to store.
Related: How Long Does A Load Of Laundry Take
Â
Media Room
To turn a small room into a media room, consider what type of space you want. If you need an area to watch movies, consider investing in theater-style seating and a large television or projection display.
On the other hand, if your vision is more geared toward media production, an audio-editing setup, microphone and lights will help create the perfect craft room. In any case, surround the room with carpeting for sound absorption to make sure the space does not become too noisy when speakers are in use (2).
Depending on how ambitious you are feeling, small additions – such as popcorn machines – can add to the atmosphere and provide practical uses to boot.
Â
What to Do With an Extra Room In The House FAQ
Â
What Is an Extra Room In a House Called?
An extra room in a house can be called many things, depending on its function and purpose. Some common terms for an extra room include guest room, home office, playroom, or storage space.
Ultimately, the name of the extra room will depend on how you choose to use it and what works best for your home and lifestyle.
Â
What Can I Do With a Spare Room, Not a Bedroom?
A spare room is an invaluable asset for any homeowner and endless possibilities for use. One great idea is to convert it into an office; the extra space can provide a great focus and productivity for work-related tasks and personal projects.
Alternatively, can be used as a hobby room and decorated according to the homeowner’s taste. Whether that be a bright citrus colour scheme filled with content creation supplies or a dimly lit basement to accommodate exercise equipment.
Additionally, spare rooms can easily double as guestrooms when hosting friends and family: stock it with spare sheets, spare towels, books, movies, or video games and you’ll have the perfect spot ready in minutes!
Spare rooms are incredibly handy spaces so make sure you maximize its potential by finding the best possible way to use this extra space.
Â
How do You Fill Up an Extra Room?
Depending on your needs and preferences, you can fill an extra room. Some potential options include converting it into a home office, adding storage solutions like shelving or cabinets, or using it as a playroom for kids or a hobby space for adults.
Additionally, you may want to consider how you can best utilize the extra space for storage. Whether that means using it to store seasonal items or organizing your belongings.
Ultimately, the key is to find a way to make the most of your extra room and put it to good use in your home. With some creativity and careful planning, you can transform this space into a valuable asset that meets your needs and helps you get the most out of your home.
Â
Sources
(1) – https://www.epa.gov/mold/what-are-molds
(2) – https://www.sciencedirect.com/topics/engineering/sound-absorption
You + Sharing This = Us as Best Friends
lessHow To Cover Popcorn Ceiling Without Removing It? Find Options Here!
You + Sharing This = Us as Best Friends
To save you money and time on home renovations, we are going to show you how to cover popcorn ceiling without removing it in this article. We’ll tell you what popcorn ceilings are, why you may want to cover them up, and the best options available for covering popcorn ceilings.
By the end of the article, you should understand the various options available to you and the method that’ll work best for your home.
... moreYou + Sharing This = Us as Best Friends
To save you money and time on home renovations, we are going to show you how to cover popcorn ceiling without removing it in this article. We’ll tell you what popcorn ceilings are, why you may want to cover them up, and the best options available for covering popcorn ceilings.
By the end of the article, you should understand the various options available to you and the method that’ll work best for your home.
How to cover popcorn ceiling without removing it
There are many ways to cover popcorn ceilings without removing them and having them replaced, which could cost a fortune. One of the most common and effective ways to cover popcorn ceilings is to hang drywall panels, apply joint compound, and paint over them.
This way, you can reduce the amount of drywall mud needed to cover a popcorn ceiling from scratch. You will instead have a new drywall surface that is smooth and easy to coat.
Â
What is a popcorn ceiling?
A popcorn ceiling, otherwise known as an acoustic or stipple ceiling, is a textured ceiling coated with a polystyrene or vermiculite treatment. The result is a bumpy, popcorn texture that absorbs sound and deafens noise. These cost-efficient ceilings were popularized in the 20th century, and many homes today still have them.
In modern times, the popcorn ceiling has fallen in popularity despite its sound-proofing benefits. Many are opting to have them covered or removed. The reason for this is more surprising than just looking outdated and unfashionable (though this could be a factor too). It is more so to do with the health hazards and economics involved.
Many popcorn ceilings built around the 1970s contained white asbestos fibers, a material we now know to cause illnesses such as cancer and pulmonary diseases (1). Since banning asbestos in the 1980s, popcorn ceilings have been made using styrofoam, producing a similar sound-proofing material.
However, homes built in the 1970s still exist today, and many are still at risk of housing dangerous fibrous materials such as asbestos.
While banning asbestos was a huge step forward for promoting good health and safe living, some additional issues still remain with popcorn ceilings. For instance, they are known to trap dust more easily than normal smooth ceilings, posing a potential health hazard, particularly for young ones.
Furthermore, it can be a hassle to clean and dust the ceiling because of the many bumps on the surface. This makes it tricky to clean out some dust or dirt particles.
From an economic standpoint, customers no longer demand popcorn ceilings. As you would expect, the value of your home suffers because of this. Many home buyers are not willing to deal with the risks of health hazards and the increased labor required to maintain it.
Thus, removing your popcorn ceiling or covered can be a great way to boost the financial value of your home.
Related: Â The Different Types of Ceiling Texture and Ceiling Finishes You Should Know
Â
Why should you cover it up?
As mentioned, there are many reasons you would want to cover the popcorn ceiling despite its noise-reduction benefits. However, there is also the option of removing popcorn ceilings altogether. So, why should we ignore this option? In truth, covering your popcorn ceiling is a far more affordable and stress-free way than removing it completely.
Once the popcorn ceiling is covered up with drywall or an equivalent, you will be protected from any potential asbestos concealed within. Removing the popcorn ceiling could have the reverse effect of releasing these dangerous particles into the air.
Furthermore, the need for popcorn ceilings was initially to cover up faults in the ceiling. So, removing it will likely incur further costs that may require a full ceiling replacement. If matters are really bad, you may even have to pay for new ceiling joists to be compatible with your new ceiling.
Covering your popcorn ceiling without removing it can even open up many design opportunities. Some potential ones include new ceiling styles, customized light fixtures, and ceiling fans.
Â
The best ways to cover your popcorn ceiling
There are many ways to cover popcorn ceilings without removing the entire ceiling. One or more of these options may apply to your situation and preferences. Depending on your skill level and confidence, you may find some of these options doable as a DIY project.
Of course, if you are more comfortable hiring a professional, there are many affordable options for you.
Â
Cover with drywall sheets
Using a drywall lift rental service, you can install drywall on your own to cover a popcorn ceiling. The cost per square foot is low, but the job can be labor-intensive. You can save on labor costs by doing it yourself or hire a professional.
Drywall sheets are the most common and affordable material used to cover popcorn ceilings. The best part about using drywall for your ceiling is the potential for a new design and the ability to add a ceiling fan and light fixtures.
Then, you can also easily achieve a glossy finish with joint compound. Once the drywall is installed and dried, you can paint the ceiling with any color scheme you choose for a stunning finish.
Â
Use joint compound and paint
If drywall panels aren’t your thing and you would rather save on the installation cost, you can consider using a skim coating of joint compound instead. This is easily the fastest and most cost-efficient way of covering popcorn ceilings. It only requires a thin layer of drywall mud coating applied using a spray can or a paint roller.
You can then smooth out the skim coat using a drywall utility knife or trowel for a clean finish.
Once the joint compound is smoothened out, you can apply your choice of paint over the coating to really put the popcorn ceiling look to rest. Despite its affordability, skim coating your popcorn ceiling can be messy. For some, it can require a skilled expert for the best results.
Thus, you should prepare your budget for joint compound supplies, paint, tools, and the cost of hiring a laborer.
Related: How Long Does Joint Compound Take To Dry?
Â
Wood planks
Another great option for covering popcorn ceilings is the installation of tongue and groove planks. You would typically use wooden planks for this method, though other options may be available.
This method involves directly installing wood planks over the popcorn ceiling. This enhances the atmosphere with a rustic, stylish, and comforting aesthetic for your home. Since it’s a series of individual planks rather than a single piece of drywall, you have more options.
Given the individualistic nature of this plank ceiling design it is a lot easier to customize. You can select from a huge variety of wood planks and stains, and you can coat it in your own preferred gloss, polish, or paint. The best part is that wood planks are highly durable and sturdy enough to last a lifetime with proper care and maintenance.
On the downside, wooden planks can be significantly more expensive than drywall sheets or skim coating options. Also, since they come as individual blocks, they can take a lot more time to install whether you do it yourself or hire an expert.
While wood planks can be durable and tough, they are susceptible to unique complications. These include warping, molding, or rotting if not properly cleaned and maintained.
Â
Drop ceilings
A drop ceiling, also known as a false ceiling, suspended ceiling, or grid ceiling, is a secondary ceiling hung below the main structural ceiling. Drop ceilings are commonly used in classrooms and offices and are known for their rectangular grid patterns and built-in light fixtures.
Drop ceilings have a reputation for being dull and depressing, but they have evolved to offer new, contemporary designs and stylish modern aesthetics. Installing a drop ceiling is relatively easy, especially if you go with a classic grid formation. They are also easy to maintain and offer flexibility in lighting fixtures.
Drop ceilings can be more expensive than wood plank or drywall ceilings, but they are still reasonably priced and within the average homeowner’s budget. They offer many benefits, including easier access to structural components like joist reference lines. You can use an electronic stud finder to easily locate the rectangular blocks connected to ceiling joists.
In double-story homes or apartment units, drop ceilings with large acoustic panels can be useful for blocking out noise from upper levels. Their suspended nature can also help reduce heat in the area by adding an extra layer of protection from the outdoors.
You can capitalize on this by using foam insulation panels or applying an insulation panel adhesive solution to your existing panels.
Related: Drop Ceiling vs. Drywall Ceiling in Basement Which is Best?
Â
Cover using fabric
Among the most daring and ambitious solutions to covering popcorn ceiling is by using a fabric cover. This option gives off a somewhat “royal” look to your room, something out of a Disney princess’ bedroom (2). Of course, there are plenty of unisex design choices you could go with, such as a plain white fabric or other neutral aesthetic.
This type of cover works best with a fancy lighting fixture such as a gold or silver chandelier acting as the central point where the fabric spouts outwards. Installing fabric ceiling covers does not require extensive skill or expertise, but it demands a fair bit of fabric materials to cover the ceiling surface.
As a DIY project, there are a few things you will need to do when using fabric covers to conceal your popcorn ceiling. Firstly, you will need to either find a piece of fabric large enough to cover the length and width of your old ceiling, or you will need to sew together some fabric panels to make up this measurement.
You should then install curtain rod brackets at the top of each wall and fold the fabric over these rods. Depending on the type of light fixture you have, you will likely need to cut a hole in the center of the fabric to allow the light or light bulb to pass through.
To cover the edges of your light fixture, it may help to install a ceiling medallion as this will aid in the visual appearance of your new ceiling.
Â
Install faux tin ceiling tiles
Developed in the late 1800s, faux tin ceiling tiles are an American innovation. Its purpose was to promote durability and affordability as an alternative to the more expensive but fragile European plasterwork ceilings.
As its name suggests, the ceiling materials that make up faux tin are not real tin. Instead, they are mineral fibers that resemble the appearance and feel of real tin.
Despite their durability and sturdiness, faux tin ceiling tiles are quite lightweight, making them easy to install. They are also quite practical as the nonporous material does not soak up stains. They only need to be dusted on occasion to maintain their clean look.
Faux tin ceilings also protect your home against fires and floods. They are not flammable (like wood planks) and resistant to rust and mold.
Best of all, using faux tin ceiling tiles can increase the value of your home because of the protective benefits they provide. Not only do they protect the home’s structure against natural disasters, but they can also protect against in-house fires. As such, faux tin tiles are ideal for kitchen areas where cooking, heating, and open flames are present.
Â
How to cover popcorn ceiling without removing it FAQ
Â
What is the cheapest way to cover popcorn ceiling?
The most cost-efficient method to cover the popcorn ceiling issue is by applying drywall mud (joint compound) and paint over the area. Other cheap methods of covering popcorn-textured ceilings include installing drywall panels, faux tin ceiling tiles, and fabric covers.
Â
How can I cover my popcorn ceiling without scraping it?
There are many options for covering up your popcorn-textured ceiling without scraping the surface. These include installing drywall panels, building a secondary drop ceiling, or simply covering the entire ceiling with fabric. You can also apply a coating of drywall mud to the ceiling and smoothen it out with a trowel to ensure a nice flush surface ready to be painted.
Â
What is the best way to cover a popcorn ceiling?
One of the best ways to cover popcorn-textured ceilings is to use wooden planks as they can be sturdy, durable, and stylish. They are fairly easy to install once you have sorted out the correct plank width for each tile, though the installation process can take some time due to the many individual pieces involved.
Â
Can you just cover a popcorn ceiling?
Yes. In fact, a common way to cover popcorn ceiling is to lay a large piece of fabric over it. Other covering options include installing a drywall panel using a tear away bead or building a suspended drop ceiling to provide an extra layer away from the main structural popcorn ceiling.
Sources
(1) – https://www.cancer.gov/publications/dictionaries/cancer-terms/def/pulmonary-disease
(2) – https://princess.disney.com/
You + Sharing This = Us as Best Friends
lessHow Long Does Joint Compound Take To Dry? Find out fast!
You + Sharing This = Us as Best Friends
If you’ve ever needed to patch up your wall with joint compound, chances are you’ve pondered “how long does joint compound take to dry?” and came to no avail. However, knowing how long your drywall mud takes to dry completely is vital to prevent further damage that could reverse the coat work. Thus, we’ve put together an informative piece to steer you in the right direction.
... moreYou + Sharing This = Us as Best Friends
If you’ve ever needed to patch up your wall with joint compound, chances are you’ve pondered “how long does joint compound take to dry?” and came to no avail. However, knowing how long your drywall mud takes to dry completely is vital to prevent further damage that could reverse the coat work. Thus, we’ve put together an informative piece to steer you in the right direction.
Â
How long does joint compound take to dry?
Joint compound typically takes around 24 hours to dry under normal circumstances. That is, when it’s not too hot or cold. However, humidity, air circulation, and room temperature can affect drying. Additionally, depending on the type of wall and the size of the hole or dent being filled, the time taken for the drywall joints to dry up completely may increase or decrease.
Related: What Is The Temperature In My House
Â
What is joint compound?
Joint compound, commonly known as drywall compound or drywall mud across the U.S, is a type of paste used for sealing up holes or to even out a dent in a wall, ceiling, or related surface. Drywall mud is made by mixing gypsum dust with water until it becomes a pasty texture comparable to cake frosting.
There are several different types of joint compounds and countless uses for them in both a home environment and in the construction industry.
Related: The Different Types of Ceiling Texture and Ceiling Finishes You Should Know
Â
Types of joint compound
Â
All-purpose drywall mud compound
This type of drywall joint compound is the most commonly used for its versatility of use in a wide range of applications. All-purpose mud compound is a lightweight solution that is great for texturing and skim-coating. Due to its thinner coats, all-purpose mud compound is great for the first coat. After that, sanding it into shape can be quite easy too.
On the downside, all-purpose mud compound is slow to dry, meaning you must wait longer before applying subsequent coats. Not only is the mudding process time increased, but this type of joint compound also has a weaker binding agent, making it less effective for coating over mesh tape (1).
With that said, all-purpose mud compound is vital for the first coat and thus should be used in conjunction with other thicker muds.
Â
Topping drywall mud compound
For the final coat, topping mud is the best option for its specialized features that deliver the perfect level of thickness to finish the job. Ideally, you will want to apply this type of joint compound after two coats of all-purpose lightweight mud have been applied to the affected targeted area.
When applied correctly, topping mud can be even easier to sand than all-purpose mud, making it the best option for your final layer.
Topping mud compound typically comes in a powder form. Unfortunately, this means you must apply water to create the mixture yourself. While this could be a hassle compared to pre-mixed solutions, the benefit is that you can control the thickness of your joint compound and save some for later use.
If you mix it well, the topping compound can provide a smooth coating for your final layer with an extremely durable bond to deliver lifelong results.
Â
Taping drywall mud compound
While the all-purpose mud is sufficient for coating mesh tape, it does not do as well as taping mud, a joint compound specializing in tape coating. This drywall mud is great for embedding joint tapes as it dries harder than other layers.
Furthermore, taping mud is a solid option if you need to cover plaster cracks, as it has a superior bonding agent that is also crack-resistant for lasting protection.
The downside of taping drywall mud is its inflexibility of use and restricted application towards tape, plaster cracks, and bedding. In addition, due to its hardness and fast-drying properties, taping mud can prove to be a challenge when it comes to sanding.
Thus, it is important to remember that taping drywall mud should primarily be used with mesh tape rather than a single solution.
Â
Quick-setting drywall mud compound
This type of joint compound is ideal for specific situations, particularly when drying time is a factor. Known as hot mud across the U.S, you can use this solution in places of high humidity or warm temperature as it’s made to set quickly.
Unlike other drywall muds, quick-setting drywall mud relies on chemical reactions to set. This is opposed to waiting for water evaporation to occur, which increases drying times.
Many drywall professionals use quick-setting mud for the first layer of coating instead of all-purpose mud. This gives the wall a stronger interior before thin coats are applied. This compound is great for humid conditions, high temperatures, and areas of high moisture content.
As such, it’s an ideal coating for bathrooms, showers, or laundry areas where it may be exposed to water.
Â
Different uses of joint compound
There are many different uses of joint compound, all of which can help you realize a better home and living environment. You don’t need to spend absurd amounts of money replacing walls and ceilings. You can apply some drywall panels or mud for an equally lasting result. Below is a list of some of the main uses of joint compound for the everyday homeowner:
Â
Wall and ceiling repair
The most common use of drywall mud is related to wall repair. This includes filling up holes and cracks in the wall or even straightening a dent in the surface. For plastered homes, this can be extremely useful for repairing ceilings affected by leaks caused by heavy rain.
Â
Drywall installation
Joint compound, mesh tape, and drywall installation go hand-in-hand. That is, one cannot thrive without the other. When installing new walls or ceilings in your home, you will need joint compound or drywall mud to coat over the mesh taping and to connect adjacent drywalls together.
Tape is also essential as joint compound seams between sheets of drywall. It can revert back to its powdery form and crack and shrink over time if not stationed with drywall tape.
Â
Covering screw holes
Filling up tiny nail holes and screw holes are common for joint compound use. As you can imagine, it does not require much time or resources. Screw holes are a common issue when refurbishing a room, as it often means taking down posters, clocks, or other objects pinned to the wall.
At times like this, drywall mud is the perfect solution for filling up those gaps and essentially hitting the refresh button on your walls.
Related: Drop Ceiling vs. Drywall Ceiling in Basement Which is Best?
Â
Starting a paint job
Before painting your drywalls or ceiling, they must be free from holes, cracks, and dents. This is because applying drywall mud over the paint will reverse the effects of the paint. It can make you start the job over again, wasting time and resources.
In this scenario, drywall mud drying time must be seriously considered. You should typically wait 24 hours before applying paint over your drywall mud.
Related: Three Common Painting Mistakes To Avoid Every Time
Â
How to tell when the joint compound is dry
The most prominent indicator that will tell you when your drywall mud is dry is the appearance and the texture. Upon first glance, the mud should appear white in color, and upon touch, it should feel hard and resistant to warping in response to applied pressure.
As a guide, you can expect about 24 hours of waiting for time for a standard coating. It’s about 12 hours for a thin layer. Finally, it’s as short as 1-2 hours for coating over tiny nail and screw holes.
Â
Factors that affect drying time
Many factors could increase or decrease drywall mud drying times and are typically associated with environmental conditions that may or may not be alterable. An example of an alterable factor would be the room temperature which can be raised with space heaters or decreased with an AC system.
An unalterable factor would be the depth of the hole or the severity of the crack being coated. This will have an immediate impact of significance on the drying time.
Â
How to make your joint compound dry faster
While we can’t alter the issue related to the drywall (e.g., the crack or hole). We can focus on external factors that could help dry the joint compound faster. Below are a few of the most impactful methods you can try that will undoubtedly reduce the drying time needed for your drywall mud:
Warm up the room
Just like a dryer uses high temperature to dry clothes, you can improve the drying time of your joint compound by increasing the temperature of the room where the drywall is situated. This could mean turning on a heater during cold weather or turning on the AC cooling system if the weather is hot.
You could also speed up the process by using a hair dryer to blow hot air into the targeted area.
Â
Buy a dehumidifier
A dehumidifier can be a great investment for a more pleasant breathing atmosphere in your room. It can also be useful for increasing the drying time of your drywall mud. The purpose of a dehumidifier is to suck out the moisture from the room, resulting in clearer air with reduced humidity.
Given the joint compound’s water content, removing the air’s moisture can assist in drying. It does this by accelerating the evaporation of water particles in the drywall mud coating.
Related: Is A Diffuser A Humidifier?
Â
Use quick-setting hot mud
Hot mud is a great alternative for a faster, quick-setting drywall mud solution that can reduce waiting time by about 50%. Unlike the standard wet joint compound mixtures, hot mud dries up via chemical reactions instead of water evaporation.
Thus, hot mud significantly reduces drying time and eliminates the need to raise room temperature or dehumidify the room.
Â
Let some air in
Temperature and humidity aside, letting in some oxygen by opening windows can greatly reduce working time with your drywall mud (2). This is because air circulation promotes faster drying due to the constant movement of air particles that absorb the coating’s moisture.
You can take advantage of an open window by using a fan to accelerate the air circulation around the room for even faster results.
Â
How long does joint compound take to dry FAQ
Â
How long does joint compound have to dry before you can paint it?
Depending on the joint compound you use and the drywall task, it can take anywhere between a couple of hours to an entire 24-hour day for drywall mud to dry. You can accelerate this process by changing the type of drywall mud you use. You can also try increasing the temperature and air circulation in the vicinity, or reducing the surrounding moisture and humidity.
Â
How can you tell if joint compound is dry?
You can use your sight and touch to determine whether the joint compound is dry. Do this by observing that the color has become pale white and by feeling the rock-solid texture of the drywall’s surface.
Â
How long does drywall mud take to dry?
Drywall mud typically takes around 24 hours to completely dry, which applies to all-purpose coatings and topping mud coatings. Hot mud coating can take as little as 12 hours to dry due to its fast-drying properties that rely on chemical reactions rather than water evaporation.
Sources
(1) – https://www.sciencedirect.com/topics/chemistry/binding-agent
(2) – https://www.rsc.org/periodic-table/element/8/oxygen
You + Sharing This = Us as Best Friends
lessWhy Is My Room So Hot? Find Out Why!
You + Sharing This = Us as Best Friends
If you’ve ever asked yourself, “why is my room so hot compared to the rest of the house?” then chances are that it really is, and that you are not imagining things. There are many reasons your room could be hotter than the other rooms in your home and there are many things you can do to fix it.
In this article, I’ll be going over all that and more. It’ll help you understand the red flags to look out for
... moreYou + Sharing This = Us as Best Friends
If you’ve ever asked yourself, “why is my room so hot compared to the rest of the house?” then chances are that it really is, and that you are not imagining things. There are many reasons your room could be hotter than the other rooms in your home and there are many things you can do to fix it.
In this article, I’ll be going over all that and more. It’ll help you understand the red flags to look out for and the actionable steps you can take for a cooler room.
Â
Why is my room so hot?
If your room does not have its own air conditioning system or HVAC system installed, it is at risk of becoming hot on certain days and seasons. On the other hand, if you have an air conditioner, the issue is likely technical. It may require the assistance of a professional HVAC technician.
Air conditioning systems aside, the issue could also lie in another factor. This may be things such as electronics, blinds with no insulation, and even the positioning of that specific room.
Related: How To Fix A Hot Room In A House?
Â
Measuring your room’s temperature
While it’s fairly easy to tell that your room is hotter than the rest of the house based on feeling alone. It can be useful to measure the room’s temperature for several reasons.
Firstly, it is easier to identify temperature inconsistencies if you understand the degree measurements of your home’s rooms. This can help you evaluate the big gap between your hot room and the rest of the house. This will help to reveal how severe the situation is.
To measure your room’s temperature, you can use a traditional glass thermometer or download a thermometer app on your smartphone (1). Many HVAC systems nowadays allow you to set the temperature of your room, but only a thermometer can give you an accurate reading.
A thermometer can accurately determine the difference between your AC settings and room temperature.Â
Related: What Is The Temperature In My House
Â
Factors that make a room hotter than another
Many interrelated factors can cause a room to be hotter than the rest of the house. The homeowner can often address these issues without the need for professional help. Sometimes, they can even cost little to nothing to fix.
Of course, more complex issues may require an inspection of your home’s ductwork. Again, this will likely require the advice of a professional HVAC expert.
Â
Your room’s position in the house
Believe it or not, the physical location of your room impacts how hot or cold it is, either increasing or decreasing the room’s temperature. For instance, if your room is in the corner of the house and facing west, it could face longer direct sunlight exposure. This is especially true if your interior wall is not concrete, thus allowing hot air to pass through.
Another factor related to your room’s position is if it’s located at a higher altitude. For example, if you have a two-story (or bigger) home, you likely have some rooms upstairs that are hotter than the rest because the heat rises.
This means the cooler your downstairs area becomes due to the air conditioning. The hotter the upstairs area will become as the heat is pushed to a higher altitude.
Speaking of your room’s position, you might be at risk of a hot room if it is situated near the laundry room. As we know, appliances such as dryers can emit a lot of hot steam that can increase the room temperature. This could also be a factor if the room is near a kitchen. This is particularly true if hot foods are frequently cooked in the vicinity.
Â
The blinds and shades are not insulated
A common reason for a hot room is poor insulation caused by your home’s exterior walls, blinds, and shades. There’s not much you can do about the walls without a heavy investment. But, you can get your hands on some blinds with better insulation.
It’s also known that dark colors absorb heat while bright colors reflect heat. So, choosing bright-colored blinds and walls can also be a good move to cool your room.
Â
Your air vents may be blocked
Not all rooms come with air vents, but if yours does, it’s time to check for any obstructions that could be blocking the airflow. Proper airflow is vital for a nice and cool room. So, a clogged air vent is a common issue that results in one room being hotter than another.
These vents may be blocked by furniture, curtains, children’s toys, or a build-up of dust that prevents air circulation.
Â
Too many electronics generate heat
We all know that electronics generate heat, but we often overlook that electronics can change the temperature of your room. In particular, if you have a large computer or television in your bedroom, the hot air emitted may be causing a heat rise to occur in your room.
Other electronics such as printers, scanners, and Wi-Fi routers also contribute to this issue.
Â
The AC system may be malfunctioning
If you have an AC cooling system in your room and are still experiencing the agony of a hot room, there could be an issue with your air ducts/ductwork. If your AC or HVAC system is ductless, then chances are you have a clogged air filter that needs to be cleared.
Dirty air filters and poor ductwork are common reasons for air conditioning systems malfunctioning. Still, fortunately, they can be fixed through DIY solutions or with the help of a professional technician.
Related: What Is A Sunroom?
Â
Things you can do to cool down your room
As you can see, many factors could be causing certain rooms to be hotter than the rest of the rooms in your home. Conversely, you can apply abundant troubleshooting to get your room temperature down to a more desirable level.
Hopefully, one of the following DIY solutions can get your room out of the heat. However, there are also options for seeking professional assistance for more complicated issues.
Â
Keep your kitchen and laundry room cool
There’s not much you can do about your room’s orientation against the kitchen and laundry room. But, you can apply a few small solutions to help the issue. For instance, you can open up windows in your kitchen and encourage the use of the stove fan to ensure no hot air spreads outside the area.
You could also install AC systems or ceiling fans in or around your kitchen to help it cool down faster and prevent hot air from escaping.
Laundry rooms are typically located near an exit to the outdoors. They are designed this way for a reason. Keeping the door open (and the flyscreen closed) when using the dryer is a great way to minimize the amount of hot steam that spreads around your house without letting pests in.
You should also ensure the other laundry door accessed from inside the house is closed when the dryer is in use.
Related: Kitchen Essentials Checklist
Â
Install ceiling fans and/or a cooling system
The most obvious solution to a hot room without a cooling system is to install an HVAC unit, a ceiling fan, or both! It can be handy to have both these units installed because your AC unit can set the standard in terms of temperature for the room. Then, a fan can spread the cold air across the room or even the entire home.
You can also opt for a blower fan if you’re on a budget. These can be positioned on your desk, side table, or wherever you spend most of your time.
Â
Purchase insulated blinds
Improving the insulation in your room can be an absolute game-changer for keeping things cool. The great thing about this option is that you can save a fortune on purchasing a new HVAC system by replacing or customizing some of your blinds and shades.
By opting for insulation-friendly blinds, the hot air from outside will be cut off in its tracks and trapped inside the shades, leaving your room cooler.
If you wish to see the view outside your window, you may opt for solar shades instead. The great thing about these types of blinds is that they are quite transparent, allowing you to see through them and still admire the outside view.
Other window treatments include installing window film (2). This can provide an artistic design to your glass windows while reflecting heat away from your room for a stylish solution.
Â
Check your air vents
The first thing to do is ensure there are no closed air vents, which can immediately cause a rise in room temperature and warm air. The next thing you want to do is have a closer look inside the air vents. This is to ensure nothing has fallen inside that could block the airflow into the room.
If your room has no air vents, it could be a worthwhile investment to install supply vents to secure a fresh wave of cold air into your room.
Â
Redistribute your home’s electronics
As mentioned, electronic appliances, computers, printers, and televisions can contribute to the increased heat of your room. Likely, you won’t want to move your TV or PC. However, things like Wi-Fi routers, printers, and scanners can be placed anywhere in your home, even in the garage!
Keeping your electronics evenly spaced out and “socially distant” from one another can help improve the temperature inconsistencies of your hot rooms.
In addition to relocating your devices, you could purchase cooling mechanisms to mitigate the heat produced. For instance, a cooling fan or cooling liquid add-on to your PC’s hardware prevents your device from overheating and reduces the overall heat emitted into the air.
It’s also good practice to regularly switch off your devices when not in use. Leaving them on all day and night will affect your room’s temperature.
Â
Contact a HVAC technician
Sometimes, there is no choice but to hire an HVAC technician to thoroughly inspect your ductwork and heating and cooling system and provide expert advice. Often, your air ducts need repairing or replacing, and an HVAC professional can make the process easier.
By all means, if you are confident to repair your air ducts yourself, then go for it. However, you risk worsening the situation if you’re an amateur like me!
For ductless air conditioning systems, a malfunction can be caused by a dirty air filter. Fortunately, this is fairly easy to fix. It only requires you to remove the filter and rinse it under a sink, in a bathtub, or using an outdoor hose. Dirty air filters can prevent the formation of cold air and instead has the effect of producing heated air into your room.
Â
Why is my room so hot FAQ
Â
Why is my room so hot even with the fan on?
If your room does not have an HVAC system, then it’s likely your room will be hot as the fan will only circulate the hot air in your room. You can produce cool air in your room by installing a proper AC unit. Your fan can help circulate the conditioned air.
Â
Why is my room so hot all the time?
There are many reasons your room could be hot compared to the rest of your home’s rooms and they can usually be fixed by yourself or with professional help. Issues are often related to HVAC settings, air leaks, closed vents, poor insulation, and the room’s physical location.
Sources
(1) – https://www.tec-science.com/thermodynamics/temperature/how-does-a-liquid-in-glass-thermometer-work/
(2) – https://iwfa.com/
You + Sharing This = Us as Best Friends
lessHow To Fix A Hot Room In A House? Find Out Here!
You + Sharing This = Us as Best Friends
Learning how to fix a hot room in a house is one of the most valuable skills you can take on as a homeowner. If you’ve ever wondered why that one room in your home is so hotter than the rest, this article is for you. We’ll review the basics of getting your room temperature up to scratch, including red flags to look out for and applicable solutions that you can try today!
How to fix a hot room in your house
Fixing
... moreYou + Sharing This = Us as Best Friends
Learning how to fix a hot room in a house is one of the most valuable skills you can take on as a homeowner. If you’ve ever wondered why that one room in your home is so hotter than the rest, this article is for you. We’ll review the basics of getting your room temperature up to scratch, including red flags to look out for and applicable solutions that you can try today!
Â
How to fix a hot room in your house
Fixing the hot room in your home often goes beyond adjusting the air conditioning system. Some simple tricks you can apply now include checking the room’s air vents, setting up insulated shades around the windows, or adding ceiling fans for better air circulation.
Perhaps you have an air conditioner or HVAC system and are still experiencing heat gain in your room. You may need to hire an HVAC professional to identify and resolve issues with your cooling system.
Related: What are Utility Bills? Costs of Being a Homeowner in the First Year (20+ costs every new home buyer should know)
Â
Which rooms are the hottest?
Any room without an air conditioner or HVAC unit is bound to be the hottest room in the house. However, you may also find rooms with a lot of windows or on a higher floor will tend to be hotter than the other rooms in your home. The location of the room in a geographical sense also contributes to how hot it is, e.g., if it is facing west and getting direct sunlight.
Related:Â Why Is My Room So Hot
Factors that make rooms hot
Many factors contribute to a room being hotter than others, and they can often be fixed directly. These factors may have something to do with your air conditioning system and a lack of cool air emitting from the source. Other factors are related to situational circumstances and the positioning of the room in question.
Â
Location
An immediate explanation for one room being hotter than another could be that it is at a higher orientation. That is, upstairs on the second floor or higher. The reasoning is that heat rises, meaning all the rooms upstairs are more susceptible to heating up in hot climates.
This is especially true if your cooling system is located downstairs. Often the cool airflow will not make its way to the rooms upstairs. Or, it will at least take a very long to get there.
Â
Sunlight orientation
One thing homeowners seldom consider is the positioning of the room in terms of its orientation towards the sun. But, as we know, the sun rises in the east and sets in the west, meaning the direction your room faces could play a part in heating and cooling your area.
Typically, the hottest rooms are those in the corner of the house facing a western direction. This results in extended direct sunlight hitting your room and increasing its temperature.
Â
Electronic devices
Another often overlooked factor for increased room temperature is the number of electronic devices in your room. Things like smartphones and tablets don’t contribute too much to this issue. However, bigger hardware such as PCs, televisions, laptops, and printers certainly play a role.
A common complaint among homeowners is the heat load produced by their installed Wi-Fi routers (1). So, it wouldn’t be surprising if your hottest room involved a similar electronic-based setup.
Â
Faulty HVAC systems
One of the more complex issues causing hot air in your room could be related to your HVAC system. More specifically, your home’s ductwork could be letting you down. Your air conditioning system’s network of air ducts is responsible for producing cool air. Then, it delivers it throughout the house properly.
Of course, even ductless systems can have issues that need to be inspected. Mainly if it produces heat instead of cool air.
Â
Ways to fix a hot room without an air conditioner
There are many ways to address the issue of hot rooms in your home. You can do many of them independently without needing to hire an inspector. In addition, many of these “quick fixes” can be applied today without the need to purchase equipment or hire a worker. Below is a list of solutions that can either be applied immediately or organized by contacting the right people.
Related: DIY Home Inspection Checklist for Buyers (Free Printable)
Â
Installing an HVAC system
It goes without saying that if you don’t already have an installed HVAC unit or AC system, you are likely to have specific rooms heat up beyond desired temperatures.
An HVAC system keeps your home cool on hot days and keeps you warm on cold days too. Combine it with a temperature sensor, and you should have no issues keeping track of your room’s temperature and adjusting it to suit your needs.
Â
Checking the vents
One solution to a hot room is looking out for any closed vents in the vicinity. Their obstruction can immediately increase the room’s humidity and temperature. You may also want to take a closer look into the vents to ensure nothing has fallen inside and is blocking the airflow into your room.
It’s also possible that you are unaware of existing air vents in your home. Sometimes, furniture could block them or be intentionally covered up by a previous homeowner. Be sure to check behind your desks, beds, and drawers to ensure no vents are being blocked.
If your room has no air vents, you can try opening windows or leaving the door open to promote cool airflow circulation across the house.
Â
Using insulated blinds
As it turns out, many blinds and shades in people’s homes are not made to insulate incoming heat from outside. Rather, they are designed to block the light, meaning there are no insulation properties to stop your room from heating. For more insulation, try blackout curtains or Roman shades and have them installed on your windows and patio doors.
Â
Purchasing solar shades
Of course, insulated blinds come at the cost of losing your view of the outdoors. Fortunately, you could opt for see-through solar shades instead, providing you with essentially the same effect as insulated blinds.
You may also opt for window film. This can offer an aesthetic design to your windows without completely obstructing the view. Although it heavily depends on the design you go for.
If you would rather not purchase new blinds or solar shades for your room, you could try changing the color of your current blinds. Darker colors absorb more heat than lighter colors, preventing things like hot spots and heat gain from occurring.
You can try painting over your blinds with a black or dark brown color as a DIY solution to save money on a new blind entirely.
Â
Installing ceiling fans
Often, the AC system in our homes do not do us justice. This is because they may not cool the entire house. In addition, they generate a lot of cooling costs that leave us scratching our head when we receive the electricity bill.
Often an oversized system takes up too much space on the wall. Instead, you may want to opt for something more simplistic and cheaper to run, like a ceiling fan.
The great thing about ceiling fans is they work well with or without an HVAC indoor unit. They can provide more air circulation around the room with a consistent breeze that can be sped up or slowed down at will.
When combined with an AC system, the ceiling fan helps to spread the cooled air to ensure the flow doesn’t get stuck blowing in a single direction only.
Â
Relocating your electronic devices
Of course, you can’t relocate all electronic devices. After all, the television belongs in the TV/living room, and the microwave belongs in the kitchen. However, appliances such as printers and Wi-Fi routers don’t necessarily need to be in the same room as the TV and PC, so consider relocating them!
Some homeowners have a dedicated wardrobe or closet that keeps all these portable electronics.
Since heated air is emitted from these electronics, you could install a cooling mechanism to disallow them to generate heat. One example is a PC liquid cooling system specially designed to keep your electronics cool and prevent overheating.
Cooling liquids and cooling fans can help prevent warm air from spreading from your devices to your room’s atmosphere. So, be sure to consider their applicability in your home!
Â
Fixing your HVAC system
The issue may require expert advice if your room is still hot despite your efforts to cool it down with an HVAC system. You can get an in-depth HVAC inspection carried out by a professional who can advise you of your system’s issues and provide solutions. Depending on your HVAC unit type, the issue could be related to ductwork or a technical issue with the AC itself.
Â
Ductwork issues and solutions
If the issue is with your ductwork, it will likely be related to the tubes sustaining a pierced hole and having the airflow compromised. You can use duct tape to seal any holes as a DIY solution. Then, no cold air leaks from the ducts’ exterior walls.
Of course, it may be an issue beyond your skill level, or you don’t feel safe attempting the fix. In that case, it is better to call up an HVAC professional to avoid damaging any ductwork further.
Another DIY solution related to ductwork is simply reallocating different rooms in your home with different ducts. For instance, if you have a faulty duct, you may opt to reposition it.
Each duct comes with a damper that essentially “dampens” the air flowing through to your room. The best course of action is to ensure that the damper to your hot room is completely open or “perpendicular” so that the maximum airflow is coming in without any obstruction (2).
You can also slightly close off some ducting dampers to sacrifice some cool air from one room and reallocate it to a room with less air or higher temperature.
Â
Ductless systems
A common occurrence with ductless HVAC systems is a dirty filter that does not transform hot air into cool air. Fortunately, this can often be cleaned out yourself by removing the filter from your AC unit and rinsing it under a sink or outdoor hose.
This will help prevent a build-up of cool air from being trapped inside the system. Unfortunately, this often results in water leaking out from your cooling unit, ultimately making your room hotter.
Â
How to fix a hot room in house FAQ
Â
Why is one room in my house so hot?
There are many reasons why one room in the house may be hotter. For example, such issues could be related to large televisions, PCs, or other electronics emitting heat. At the same time, other problems arise from the location and orientation of said room.
Â
What should I do if my room is always hot?
If your room is always hot, it is important that it is not left unchanged and that you implement some DIY fixes or professional solutions. Some of the fixes you can try now include clearing air vents, removing electronics, opening windows, or installing solar shades and insulation blinds.
Â
Sources
(1) – https://www.neweggbusiness.com/smartbuyer/networking/wireless-router-hot/#:~:text=If%20your%20router%20is%20hot,temperature%20below%2090%20degrees%20Fahrenheit.
(2) – https://www.mathsisfun.com/definitions/perpendicular-lines.html
You + Sharing This = Us as Best Friends
lessWhat Is Drain Cleaning (And How Do Drain Cleaners Work)
You + Sharing This = Us as Best Friends
Clogged drains are one of the biggest household problems we have to deal with at some point in our lives. If you’re new to drain cleaning or have never had to fix a clogged drain before, then here’s everything you need to know about dealing with that problem once and for all. Let’s get started!
... moreYou + Sharing This = Us as Best Friends
Clogged drains are one of the biggest household problems we have to deal with at some point in our lives. If you’re new to drain cleaning or have never had to fix a clogged drain before, then here’s everything you need to know about dealing with that problem once and for all. Let’s get started!
What is drain cleaning?
Most of us would rather think about anything other than our drains. But the fact is that we have to think about them because we often neglect them until they clog and cause a mess.
So, what is drain cleaning? It clears stubborn clogs in sinks, bathtubs, showers, or any other drain using high-pressure water.
There are two main ways to do this: chemical drain cleaners (typically caustic chemicals such as sodium hydroxide or potassium hydroxide) and mechanical drain cleaners (hand-held augers) (1).
Â
What is meant by drain cleaning?
Drain cleaning is the process of removing obstructions from a drain or pipe. This can be done manually or with the help of a machine. If a clog does not go away, it may have to be removed by hand.
Depending on the severity of the clog, you may only need liquid cleaners or something more substantial like hydrochloric acid. The latter should only be used by trained professionals handling this chemical!
Â
What do drain cleaners do?
There are many causes of clogged drains, but the most common culprits are food particles, hair, grease, and soap. When these items find their way into a drain, they can form a layer over the opening, preventing water from flowing.
This creates an environment for bacteria to grow, which will eventually cause the drain to become blocked entirely with sludge and debris. To fix this problem, this is where drain cleaners come in.
Related: Low Hot Water Pressure: 5 Causes and What To Do
Â
Chemical drain cleaners, natural drain cleaners, or air burst drain cleaners?
There are many different types of drain cleaners on the market. Some work better than others. Here are the most popular types of drain cleaners and how they work.
Â
Chemical drain cleaners
This drain cleaner is made from chemicals that create acidic reactions to organic debris, such as grease or soap scum. The reaction helps break down the build-up in the pipe so it can be flushed away easily without any extra effort on your part. The only downside to this type is that it can take up to six hours before it starts working, but once it does, it’s effective.
A chemical drain cleaner can come in solid and liquid forms. Between the two, the liquid drain cleaner is widely used.
Â
Air Burst Drain Cleaners
This type uses accelerated gas, which creates a force on standing water and dislodges clogs. Professional drain cleaning service providers widely use this.
Â
Natural Drain Cleaners
As the name suggests, a natural drain cleaner is a product meant to unclog drains. It is made from all-natural ingredients.
The most popular natural drain cleaners are water, baking soda, and liquid soap. All you need to do is pour in a mixture of hot water and baking soda, wait 15 minutes, then pour in boiling water. If that doesn’t work, try pouring a mixture of vinegar and baking soda down the drain. If these methods don’t work, call an expert plumber who will have more specialized tools at their disposal.
Related: Force of Nature Cleaner Review
Â
How does a liquid drain cleaner work?
Drain cleaners break down dirt and gunk to dislodge it from the pipe. They are available in liquid and powder form and work by creating a slurry that can be poured down the drain. The slurry will then create suction as it moves through the pipe, which will help pull debris up.
Â
How does a local plumber clean a drain?
A local plumber uses a camera, snake, and drain augers to clean a drain. First, he inserts the camera into the drain pipe to locate the clog. Next, he sends the snake through the pipe into the obstruction.
The drain auger is then attached to break up and remove any obstructions inside pipes. When that’s done, the debris can be flushed away with water.
In some cases, depending on the blockage or damage to a pipe, a plumber might have to do something more involved, like replace parts of a broken or leaking pipe. It takes time for these repairs, so be sure to call your local drain cleaning company as soon as possible if there is an issue!
Related: The Most Popular Types of Kitchen Sinks
Â
How much does it cost to clean a drain?
Since there are a lot of different factors that can affect the price, it’s hard to give a definite answer. The drain cleaning cost can vary drastically depending on the job’s complexity and how much work needs to be done. Generally, residential drain cleaning jobs range from $50 to $350, while commercial jobs start at $150 and can go upwards of $1,000.
Â
How to use a drain cleaner
It is worth noting that these products come in different types. When drain cleaning, you can use chemical drain cleaners that are made of drain cleaning chemicals. These drain cleaners can also come in powder or liquid form. Between the two, the liquid drain cleaner is easier to use. Just pour it into the clogged drain, and let it do its job.
Alternatively, you can use augers, which require you to exert effort to remove clogs (2).
Â
Do drain cleaners actually work?
Yes, liquid drain cleaners work. But the results vary depending on what is causing the clog.
Â
How long do drain cleaners take to work?
The efficiency of drain cleaners depends on the cause of the clog. Most of the time, a drain cleaner works right away. Sometimes, you may have to repeatedly use it or try different options until the clogged particles are removed.
For example, you can use a powdered chemical drain cleaner with liquid drain cleaners if you are dealing with stubborn clogs. Tools like snakes and augers can also be used if you are getting rid of hair strands and other solid materials.
When dealing with tree roots, the best option is to call professional plumbers!
Â
Do drain cleaners dissolve hair?
Hair takes time to decompose. But a natural drain cleaner can still remove hair strands blocking the drains.
Drain snakes and an auger are the best tools to remove hair from a drain. A wire coat hanger bent into a different shape may also work. A plunger, on the other hand, won’t work.
Boiling water, salt, vinegar, and baking soda may also do the trick. Pour boiling water, half a cup of baking soda, and a cup of vinegar into the drain, and let the products sit for at least an hour. Then pour more boiling water down the drain to rinse.
Related: How to Clean a Bathtub with Bleach
Â
When to call a professional drain cleaning service?
If you’ve noticed that your plumbing system or drains are clogged, it’s time for some drain cleaning work. And to do the job, it’s time to call a professional plumber.
Hiring a professional can save you money in the long run, as they can inspect pipes and catch any potential problems. Professional drain cleaners use hydro jetting equipment, chemicals, or high-powered water jets to clear the clogs.
When done, they should dry up any standing water, remove any debris left behind, and ensure all fixtures are in working order. For their work to be guaranteed, most professionals will offer warranties on their work.
Sources
(1) – https://pubchem.ncbi.nlm.nih.gov/compound/Sodium-hydroxide
(2) – https://www.aboutmechanics.com/what-is-auger-drilling.htm
Â
You + Sharing This = Us as Best Friends
lessWhat Is A Sunroom? Everything You Need To Know
You + Sharing This = Us as Best Friends
If you are wondering “what is a sunroom,” then you have likely heard this space referred to by one of its other interchangeable names.
A sunroom is a glass- or screen-enclosed space with a lot of natural sunlight and direct outdoor access. It is designed to be a transitional space for use during milder weather, allowing you to enjoy both the indoors and the outdoors simultaneously. This living space is often
... moreYou + Sharing This = Us as Best Friends
If you are wondering “what is a sunroom,” then you have likely heard this space referred to by one of its other interchangeable names.
A sunroom is a glass- or screen-enclosed space with a lot of natural sunlight and direct outdoor access. It is designed to be a transitional space for use during milder weather, allowing you to enjoy both the indoors and the outdoors simultaneously. This living space is often referred to as a patio enclosure, a Florida room (at least in one state), a solarium, a screen room, or a sun porch.
It allows you to enjoy the outdoors without all of nature’s elements, like bad weather and critters. In addition, it is often constructed with a large amount of space dedicated to glass, which gives you an unobstructed view of the outdoors from the comfort of your home.
It is not required to have electricity or heating and cooling, although it will likely require building permits before it can be added on to a house. This building codes factor is what makes it more cost-effective than a room addition might be.
Â
Sunroom Types
There are a few basic types of sunrooms:
There are two options for constructing patio enclosures: prefabricated and stick-built addition. Prefabricated sunrooms are manufactured kits with everything necessary to assemble the sunroom, including the framework pieces and glass panels. Stick-built additions are custom-built sunrooms designed to your specifications.
Â
Considerations for Adding a Sunroom
Patio enclosures or sunrooms can add value to your home and your enjoyment of it. However, there are some things to be considered before adding a sunroom. It is also vital to consider whether you want a sunroom or an actual room addition.
Related: Â Rooms in a House (With Pictures!): See if You Know These 80+ Different Room Names
Â
Heating and Cooling
Sunrooms are not required to have central heating and cooling like a room addition would. Sometimes heating is built-in when constructing a custom-built sunroom, but not usually cooling.
As technology has advanced over the years, heating is often added with electric baseboards, fireplaces, or portable heaters. Unfortunately, cooling is not as simple unless it is hooked up to the HVAC system. Opening up the glass panels, using fans, or plugging in a portable air-conditioner are usually the only forms for cooling.
Its lack of cooling could make the room uncomfortable for year-round use during the hot summer days. But, of course, this is often determined by your location as well – someone living in Southern California will have different weather than someone in South Central PA (1).
Â
Electricity
Unlike a true room addition, sunrooms are not required to have electricity wired in. It is more common to include when building a new one, but it is not required. If you are building a custom-built sunroom or even a prefabricated one, wiring for electricity will likely be added.
Note: wiring your sunroom with electricity does increase the construction cost, but it also increases the added value.
Â
Added Value
Construction costs for a sunroom generally tend be lower than a regular room addition. In most communities, it does not have the same building codes.
The cost per square foot will vary depending on quite a few factors, like whether it is a custom-built or pre-fabricated sunroom, three- or four-season room, built-in heating/cooling, etc. However, costs can add up quickly when you start to consider things like the energy efficiency of the glass and the design of the sliding patio doors.
There is also the benefit of having the additional flexible room in your home. It does not have a defined use like the rooms in the rest of your house might have. Its bright and airy features make it a great reading room, exercise room, office, or sitting room. It can be used however you want.
Â
What is a sunroom FAQ
Â
What’s the purpose of a sunroom?
A sunroom is designed to be an additional living area used in mild weather. It is a transitional space that connects your home to the outside.
Although it is commonly used as an extra sitting room, it can be considered a bonus room. Therefore, its purpose can be whatever you need it to be.
Â
What is the difference between a sunroom and a sun porch?
There is no difference between a sunroom and a sun porch. Both are rooms enclosed with screen or glass and a roof that extends the indoor space outside. Therefore, sun porch is just another term for a sunroom.
Â
What is the difference between a sunroom and a patio room?
A patio room is another term for a sunroom. The term patio is often used interchangeably with porch or room when referring to a sunroom addition specifically. The only time it differs is when you refer to patio enclosures, enclosed spaces built over an existing patio or paved area near or adjacent to the house.
Â
Can a sunroom be a bedroom?
A sunroom is not designed to be a livable bedroom space. The room is often oddly-shaped, designed to allow in a lot of natural light, and usually not insulated adequately for bedroom use. It can be feasible for many homeowners looking to add square footage.
Still, some accommodations would need to be made first, specifically figuring out how to manage the light/privacy and make temperature accommodations for the weather.
Related: The Only Bedroom Essentials List You NeedÂ
Â
Can you use a sunroom in the winter?
Not all sunrooms are considered four-season sunrooms. Its design is for an additional in-between space that allows enjoyment most of the year. This is especially true if you live somewhere with all four seasons and your room addition is a three-season sunroom. It is not designed for winter weather.
In order to keep using three-season sunrooms year-round, there are a few options that could be applied to keep the sunroom warm:
Â
Do you need a foundation for a sunroom?
Sunroom construction requirements vary from community to community. A sunroom addition will generally need a proper building foundation, although some lightweight kits can be built onto an existing patio or porch.
Â
How do you keep a sunroom warm at night?
It sounds simple enough, but the best way to keep your sunroom warm at night is to stop the heat from escaping in the first place. Similar to keeping a three-season room warm in winter, this can be accomplished in a few different ways:
The most efficient way is that you will want the sun to shine inside and warm the room during the day but close everything up to keep the heat in at night.
Â
Can a sunroom be a living room?
Yes. One of the best features of patio rooms is the additional, versatile living space it provides your home. Using your sunroom as a living room has a lot of advantages as well:
A three- or four-season room can be the perfect solution for an additional living room or just a new space to host guests.
Related: Living Room Essentials Checklist: 50+ Essential For A Living Room Items You Need
Â
Can I put a regular couch in a sunroom?
You technically can put a regular couch or furniture in three or four-season sunrooms, but there are a few things to consider if you do. A regular couch is designed for indoor use and is expected to be rarely exposed to direct sunlight. Although it would not be damaged by the cold or any other outside elements, the constant direct light will cause fading or sun damage.
Outdoor furniture is the usual recommendation for sunrooms, but finding a way to shade or cover traditional furniture could also be an option.
Â
Can you put wood furniture in a sunroom?
Using wood furniture in your sunroom gives the space an outdoor feeling without limiting yourself to only outdoor furniture. Wood furniture requires a bit of maintenance to prevent damage and keep the pieces looking good over time:
Â
Do sunrooms add home value?
Yes, really well-made sunrooms can add value to your house, typically around 4-6%.
While porches or screen rooms specifically do not add any liveable spaces to the home, it is possible for a three- or four-season sunroom to add living space and increase the overall square footage. In addition, the natural brightness of the sunroom is an attractive feature to many. Plus, there’s the added value of an additional room for you to enjoy in your home.
Â
Are sunrooms worth it?
There are definite pros and cons to sunroom additions that might make it worth it for your house.
There is, of course, the cost factor – it is generally more budget-friendly when compared to room additions since it does not require the same necessities, but it still has a cost. If you add a sunroom, it could eventually pay for itself in property value, although this increases property taxes (2).
On the other hand, sunroom additions provide versatile spaces between the indoors and outdoors that can be used in a variety of weather. It can be used for a sitting room, an exercise room, an office, or almost anything you might think of. However, the room is used, enjoying it and your family’s combined experience is what adds to your home.
This answer will vary from person to person.
Â
Conclusion
Considering a room addition for your home, you will need to consider your vision. For example, a sunroom is a tempting option if you are looking for a bright and airy space that easily transitions from the indoors of your home to outside.
It might even be the perfect choice if you are looking for flexibility in how the room is used. Maybe it is a room to rest and relax in now, but changed to a greenhouse or workout room in a few years.
Sources
(1) – https://www.onlyinyourstate.com/states/southern-california/
(2) – https://www.investopedia.com/terms/m/millrate.asp
Â
You + Sharing This = Us as Best Friends
lessDecluttering Tips For Hoarders. Get Started Now!
You + Sharing This = Us as Best Friends
People don’t become hoarders at random. Stressful life events and mental health issues spark the development of unhealthy attachments and cause them to hold onto unnecessary items. They come up with the irrational idea that each item might be useful later. Their compulsive hoarding tendencies worsen until every room in the house has piles of junk. Here are 14 top decluttering tips for hoarders to help you overcome your disorder,
... moreYou + Sharing This = Us as Best Friends
People don’t become hoarders at random. Stressful life events and mental health issues spark the development of unhealthy attachments and cause them to hold onto unnecessary items. They come up with the irrational idea that each item might be useful later. Their compulsive hoarding tendencies worsen until every room in the house has piles of junk. Here are 14 top decluttering tips for hoarders to help you overcome your disorder, reclaim your storage space and reorganize your home.
Â
The Cleanup Stage
Initial cleanup is always the hardest part of ditching a compulsive mental disorder like hoarding. So your decluttering efforts should start with clearing out all of the obvious trash.
You can expect to feel stressed out as you go through these decluttering tips for hoarders, but this feeling is natural and necessary. Discomfort is essential to breaking any bad habit, whether it’s drinking, smoking or hoarding.Â
First and foremost, you need to gather these resources for junk removal and deep cleaning:
Once you gather your supplies and establish your locations, you need to get as many hands as possible. Humble yourself and ask your family and friends for help. You might feel embarrassed, but that’s another uncomfortable feeling you must overcome. Acknowledging the problem is the first step in solving it. Your loved ones might have their own decluttering tips to help you.
A close family member or friend will be happy to help you beat your hoarding disorder. You should never feel alone when addressing your mental health problems. Achieving peace and happiness requires a team effort and a stable support system.
You have your cleaning supplies. You booked a storage space and know where to dump your trash. Your family and friends are here to support you. Everything is ready.
Before you begin, make a to do list with everything you need to accomplish in your entire home. Then, follow these decluttering tips to break your hoarding tendencies and rediscover your clutter-free home.Â
Related: How to Clean a Hoarder House: A Simple 5 Step Plan and The House Cleaning Supplies Checklist (You Must Have These)
Â
The walkways are the most practical places to start the decluttering process. Clearing out these areas will make the rest of the project go much faster.
Hoarders also tend to store unnecessary items from the inside out, so you’ll deal with the freshest things first. After that, you can get used to the house’s odor and clear a few pathways before moving to the messiest stuff.
Make sure you wear shoes or boots with thick soles. You’re almost guaranteed to step on glass and other sharp objects as you navigate the house. Be careful around staircases, as well. A step or guardrail could be weak due to the junk’s weight and break when you put more pressure on it.
Â
After clearing out the house’s pathways, start with the most problematic room. This “eat the frog” philosophy is a great way to build confidence and momentum for the rest of the project.
The worst room is also most likely to contain the oldest garbage. You must remove this stuff ASAP to avoid further damage from pests, mold, and other structural threats. Start decluttering, and don’t stop until you’ve cleared out the entire room.
Your separation anxiety might start to increase once you begin cleaning the rooms. But, again, this feeling of discomfort is normal, especially when facing so much stuff. Embrace it and dive into the decluttering process without a second thought. Stay focused and power through. Only move to the next room once you remove all junk from the first.
Â
Food waste is the first category of trash you should prioritize. Rotting food is the main cause of the house’s odor, pest infestation, and mold buildup (1). Of course, other types of garbage also contribute to these issues, but food is the most problematic junk.
Take a trash bag and immediately throw away anything associated with food:
Don’t be surprised if you come across the first signs of animal infestation when sorting food waste. Droppings, food collections, and nests could be behind every item. That’s why your mask and gloves are so important.Â
Â
As you sift through the trash, start separating items into designated piles. Paper, clothes and home appliances should be the three main piles. This strategy allows you to determine which items are salvageable.
You can also make a pile of unwanted items you know you don’t need. For example, you might go through a junk drawer and dispose of duplicate items or broken tools. Old clothes that no longer fit or have holes can also be tossed immediately.
Your nostalgic feelings will flare up during this stage, so lean on your friends to bolster your mental health. You may even consider seeking professional help to overcome depression or anxiety stemming from letting go.
Â
This step is perhaps the most important of all decluttering tips for hoarders. You must decide whether to keep, donate or discard each item. It will be the hardest test thus far, but you must permanently climb this mountain to solve your clutter problem. Take input from your friends. They can serve as the collective voice of reason and keep your hoarding tendencies in check.
It can be easiest to start with your unwanted stuff, or anything you know you don’t want to keep. First, start with a donation bag. Anything still in good condition can be taken to a donation center. From there, sort through the items that are damaged and unusable. Finally, decide what you need, and what you can throw out.
Take as much time as necessary to process this stage. An all-or-nothing approach works for some people, but you should start by taking baby steps. For example, decide the fate of small objects before moving to the biggest and most sentimental items.
See how your subconscious reacts before making any drastic decisions. Don’t feel pressured to let go of everything if you’re not ready.Â
Â
Once you’ve cleared enough space, you should check on the house’s utilities. Has the plumbing or electricity been damaged? Is the HVAC system functioning properly? Residences often require thousands of dollars in repairs in extreme cases of hoarding disorders. Your home probably isn’t that damaged, but you need to double-check.
Â
Now it’s time to bring life back into the house. You no longer recognize the home you once loved when you have so much clutter.
Open the windows to let the cross-breeze freshen the home’s air quality and remove the foul stenches.
Bring in some houseplants and air fresheners, too. It will take days to neutralize the bad smells completely. Finally, deep-clean the walls, floors, and countertops to make them look good as new.Â
You should also consider buying new furniture and repainting the walls and ceilings. Giving the interior a fresh and stylish appearance will solidify your transition to a clutter-free life.
Â
You can always hire a professional cleaning service if the decluttering project is too emotionally and physically demanding. An independent company has no attachment to the house’s unnecessary items, so the workers won’t have any trouble decluttering. They can also address pest infestations, utility damage, or structural issues with care and expertise.
You can expect the initial decluttering process to take at least a few days, depending on how much clutter you have. It will become easier to throw away items as the project goes along.
Many hoarders don’t make it this far, so you should feel proud that you overcame your unhealthy attachments. Finally, you’re ready to start a new chapter of your life.
Related: Deep Cleaning Checklist: Free Download PDFÂ
Â
Long-Term Organization Strategies
Cleaning the house is a huge step toward escaping your hoarding disorder, but the job isn’t finished yet. Strengthening your mental health and maintaining a clean home is an ongoing task that requires daily commitment. It might take months to settle into your new habits and defeat your clutter problem.Â
Most conventional organization techniques aren’t sufficient decluttering tips for hoarders. You will either quickly grow tired of the methods or become overwhelmed with anxiety as you rummage through all your old belongings.
You need strategies that will keep you engaged and demand constant accountability. Here are the best of the best.
Related: How To Declutter Your Home In 10 Easy Steps
Â
Classic journaling is the best thing anyone can do to clear their mind. Putting your thoughts and feelings on paper is a healthy and therapeutic way to cope with your problems. There are numerous journaling prompts you could try, but the best ones focus on addressing bad habits.
Rather than using your journal to wallow in self-pity, use it to confront your negative emotions. Take mental strife outside your head and bring it into the real world. Perform a written exorcism of the inner demons that caused you to develop a hoarding disorder. Running from them caused your clutter problem, so you must face them head-on.
Â
This straightforward rule system is a good fit for recovering hoarders because it requires strict attention to detail. You must give each of your household items a singular point of contact. They can touch the table, floor, shelf, or container but nothing else. Everything should have an assigned spot.
This strategy is most useful for the house’s busiest areas, such as the bathroom and living room. These places often accumulate many unnecessary items if the occupants aren’t paying attention.
Indeed, this problem might have caused your hoarding tendencies to worsen. Rather than allowing your belongings to pile up in random places, you can use bowls, hooks, racks and other individual containers for different types of items.
Your touchpoints will also make everyday tasks much easier. For example, applying the one-touch rule to your kitchen or home office will improve your productivity. In addition, this method enables you to cook, eat and work on your projects in an organized setting.Â
This rule is the inverse of hoarding. You can still have lots of items in the house, but you need to arrange them practically instead of letting them pile up. If you’re struggling to let go of some hoarded items, you can reorganize them instead of donating or selling them.
Related: How To Declutter a Home Office
Â
The KonMari organization method has gained popularity in recent years. The method’s creator, Marie Kondo, uses the word “joy” as the foundation of her philosophy.Â
It requires you to answer a straightforward question: Does the item spark joy or not? This question cuts to the real problem behind your organizational deficiencies. If something contributes to your well-being, you can feel confident in keeping it. If it adds to your bad habits, get rid of it. You have no further use for it.
However, it’s important not to misinterpret or misuse the word “joy.” For example, your phone or laptop might not make you joyful, but they’re necessary to communicate. They make your life easier and thus make you happy. Now apply this logic to your unnecessary items. Do they bring genuine happiness? Of course not.Â
The KonMari method also suggests that you go from smallest to biggest. This linear progression prevents the decluttering process from overpowering you with nostalgia. It also ensures you don’t fall back into your hoarding habits — the main thing you’re trying to avoid.Â
This strategy only works with genuine honesty. Otherwise, it’s a waste of time. It forces you to discard your irrational biases and past experiences — the two main factors that cause people to develop hoarding disorders. It’s remarkably easy to discard objects once you acknowledge they’re holding you back from reaching your best potential.
Â
The minimalist game is another decluttering tip for hoarders that focuses on altering your mindset. Minimalist bloggers Joshua Fields Milburn and Ryan Nicodemus created this game to simplify their home cleaning projects.
It’s simple: The number of items you throw away must equal the day of the month. After that, it slowly becomes more challenging and forces your mind to adapt to the new rules.
Throw something away on the first day of the month, then two items the next day and so on. There are no other requirements. Everything in the house is fair game. Each day will make more clutter disappear and increase your mental resilience. If you stick to the game for an entire 31-day month, you will remove 496 needless objects.
The minimalist game requires a greater long-term commitment than the other organization methods, but that’s the beauty of it. Your confidence will increase, your decision-making will improve, and you will feel more comfortable letting things go as the days pass. Recovering from a mental health issue is a slow and steady effort.
Â
The Pomodoro technique gets its unique name from the Italian word for “tomato,” paying homage to the popular red tomato alarm clock that people often use when cooking. These timers provide the foundation for the time-based Pomodoro technique. Francesco Cirillo coined it more than 40 years ago to address his own organizational shortcomings.
The Pomodoro technique is easy to follow: 25 minutes of work followed by five minutes of rest. These contrasting time frames establish some much-needed structure in the process and help you stay on task. After the first four 25-minute blocks have passed, also known as a “pomodori,” you can rest longer as needed.
This technique is a handy decluttering tip for hoarders because it establishes a healthy, reasonable pace. You still have to follow the time prompts, but they prevent you from becoming stressed and keep you grounded in each moment. Each time block feels more fulfilling than the last, helping you build confidence as the project progresses.
The large working time block presents a reasonable obstacle, while the brief rest period allows you to regather your thoughts. The Pomodoro method is a surefire way to work in moderation and ensure long-term productivity. You need to regain a solid mental state to overcome your hoarding tendencies, which could be the ultimate solution.
Â
Swedish death cleaning is a specific decluttering tip for hoarders introduced by Margareta Magnusson in her self-help book called “The Gentle Art of Swedish Death Cleaning.” The approach is simple: you remove all unnecessary items you wouldn’t want your family to deal with if you died.
Nobody likes to think about it, but our families must sort through our belongings when we pass away. So, with this picture in mind, do you want them to inherit a house with a clutter problem, or would you rather leave behind an organized home?
Hoarding disorders are inherently selfish. Looking beyond yourself will help you break bad habits and regain mental health.
Swedish death cleaning is the most abrasive approach (2). It provides a rude awakening and forces you to adopt a new perspective on your belongings. However, you don’t have to dive in headfirst.
Ease your way into the technique and let your rational side slowly take over. Mental preparation is one of the most crucial decluttering tips for hoarders of all kinds.
Â
Defeat Your Hoarding Disorder Once and for All
Your hoarding tendencies aren’t accurate reflections of your authentic personality. Many factors can make you a hoarder, especially traumatic life events. Almost anyone can find themselves accumulating too much stuff overtime.
However, you can’t use your personal trauma as an excuse to fill up your home with unnecessary items. This coping mechanism is unhealthy and unsafe. So first, you need to hold yourself accountable and recognize this habit as a mental illness. Then, realize that it is possible to have a healthy living space.
Don’t let this unfortunate stage in your life define you forever. You have the inner strength to overcome this problem. However, you need a little help unlocking it. These are some of the best decluttering tips for hoarders that will help you reclaim your mental health and create a permanent clutter-free home.
Sources
(1) – https://www.cdc.gov/mold/faqs.htm#:~:text=Mold%20will%20grow%20in%20places,carpet%2C%20fabric%2C%20and%20upholstery.
(2) – https://sweden.se/
You + Sharing This = Us as Best Friends
lessSolarium vs. Sunroom: Which is right for you?
Septic Tank Vs Sewer: What is the difference?
How to Stop Birds From Pooping on My Car?
How Long Does it Take to Install a Toilet?
How Long Does it Take to Install Carpet?
Can You Use Pine Sol on Laminate Floors?
Free October Calendar Printable
Free September Calendar Printable
How to Manifest a House (Even in a Hot Market)
Can You Put Pans in the Dishwasher?
Can You Microwave Plastic? Read before doing
What is a Frying Pan? Everything You Need To Know (2022)
Henckels vs Zwilling Knives
Can You Use Nespresso Pods in a Keurig?
Great Jones Cookware Review: Are they a good brand?
How to Dispose of Old Knives Properly
The Best Induction Cookware Set for Home Chefs
Calphalon vs Cuisinart: Which is better?
Nespresso vs. Keurig: A Winner is Chosen (July 2022) - Millennial Homeowner
You + Sharing This = Us as Best Friends
In this review, two of the most globally recognized coffee maker brands shall battle it out to decide which is best once and for all. So strap yourselves in and keep your eyes peeled because you won’t want to miss this epic matchup featuring Nespresso vs. Keurig, an all-out bout where both brands will be weighed up against each other on the scales of supremacy. By the end of this duel, I will be nominating a clear winner based on my own
... moreYou + Sharing This = Us as Best Friends
In this review, two of the most globally recognized coffee maker brands shall battle it out to decide which is best once and for all. So strap yourselves in and keep your eyes peeled because you won’t want to miss this epic matchup featuring Nespresso vs. Keurig, an all-out bout where both brands will be weighed up against each other on the scales of supremacy. By the end of this duel, I will be nominating a clear winner based on my own criteria as we look into the pros and cons of each brand, what they offer, what they lack, and what gives them the edge over their rivals in coffee brewing.
If you live in the US (and love coffee), you undoubtedly would’ve heard of Keurig, the leading manufacturer of single-serve coffee makers, K-Cup coffee pods, and ground coffee filters. On the other hand, if you happen to reside in other global regions such as Australia (like myself) or Europe, you would be more familiar with the Nestle-owned, Swiss brand of coffee makers known as Nespresso. What’s so interesting is that both Keurig and Nespresso are huge brands on a global scale, and yet they differ in very significant ways. In this review of Keurig vs. Nespresso, you’ll come to understand exactly what those differences are and how they are relevant to your own preferences, and that’s where the fun begins.
Â
Keurig Overview
Keurig is a beverage brewing system, otherwise known as a coffee maker, owned and manufactured by the Keurig Dr. Pepper company in America. In addition to selling coffee machines, they also sell single-serve coffee containers known as K-Cup pods, as well as various other beverage pods such as tea and hot chocolate. Trusted by some of the biggest coffee brands in America, including Starbucks, Green Mountain, and Cinnabon, Keurig has truly established itself as the go-to coffee machine distributor in the United States.
Â
Nespresso Overview
Based in Switzerland, Nespresso is an operating unit under the brand Nestle, a name that combines “espresso” with “Nestle. The company is known for producing coffee machines, single-use capsules, pods, and other brewing-related goods and has since become a world leader in the espresso industry and a trusted brand among coffee lovers everywhere. With its new Nespresso Vertuo range, the brand has embarked into new coffee brewing territory and is considered, in many ways, a pioneer of coffee making.
Â
Nespresso vs. Keurig: What’s the difference?
Design
Nespresso machines are designed to be quite compact and aesthetic in appearance. These machines come with a water reservoir, a Nespresso capsule compartment, and, depending on the model, an Aeroccino milk frother. The control panel is quite simple but effective, and you’ll get used to working it out in no time.
Keurig machines are also made in a compact design and deliver the same durability and reliability you’ll find in a Nespresso machine. In terms of control interface, some Keurig models come with an LCD digital touch-screen display, which makes for a more interactive brewing experience.
Winner: Keurig
While both machines have proven to be reliable and durable while producing their intended results, Nespresso cannot match the sophistication of some of the Keurig interfaces. It could be argued that such interface technologies are not needed for Nespresso, but I do think it’s a critical component that affects the overall experience of making coffee; hence Keurig triumphs in this battle.
Â
Storage
Nespresso machines usually allow about 10 Nespresso capsules to fit in the empty pod cartridge, meaning you can have about 10 cups of espresso before needing to empty it out. The machine’s dimensions make it easy to store in tight spots on the kitchen top, and its slim build allows it to sneak between your other appliances.
Keurig machines mostly don’t come with pod storage, with exceptions such as the K-Mini Plus or the K-Slim, which come with small pod compartments. More often than not, Keurig coffee makers have large water reservoirs as they are often built with the intention of making carafes of coffee or tall Americanos. While this is great for brewing more coffee before refilling the water tank, it’s not so great for saving on counter space.
Winner: Nespresso
A larger water reservoir is usually a good thing, but not when it comes to storage, and that’s why Nespresso’s got the edge on this one. Not only that, of course, as all Nespresso machines come with some sort of capsule container storage, something which is not as common with Keurigs. Of course, it all comes down to the specific model, but on an overall note, I have to give Nespresso the win when it comes to storage features.
Â
Usability / Ease Of Use
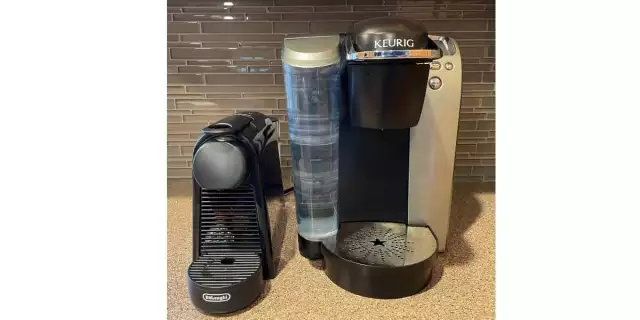
Nespresso coffee makers are designed to be easy and convenient, with no need to ground your own coffee or measure the right amount of coffee powder. While this is true for most coffee makers, Nespresso takes it to another level by incorporating straightforward controls that brew quality coffee and froth milk with the press of a single button (like this Nespresso Essenza Mini featured above).
Keurig coffee makers differ slightly in that they don’t often come with a milk frother unless you go for the Keurig K-Café model. On the other hand, many Keurigs have an LCD touch-screen control panel interface, something not seen on Nespresso models. These controls come with adjustable brew temperature, a wide range of cup sizes, and even language preference.
Winner: Keurig
Both Nespresso and Keurigs come with a simple control panel that can brew different sizes of coffees or espressos. While Nespresso may have a more simplistic design, and many will argue it’s actually easier to use than Keurig, my pick still goes to Keurig. The touch-screen interface simply provides far more customizable options than Nespresso, and if you’re like me and enjoy trying different brews, sizes, and temperatures, then you’ll find it a lot easier to achieve this with a Keurig.
Â
Coffee machines range
Nespresso’s range of single-serve espresso machines is far and wide. With the inclusion of the Nespresso Vertuo premium capsules, the brand has truly perfected the art of espresso brewing. Perhaps the main selling point, in my opinion, for Nespresso’s machines are their Aeroccino milk frothers, which adds an exciting new dynamic to their products.
Keurig’s line of machines ranges from the single-serve coffee maker to the Keurig K-Elite and K-Cafe range. You really can’t brew a proper espresso without the Keurig K-Cafe, though, and that is one of the downfalls of the American brand. On the other hand, if you do find yourself with a K-Cafe, you’ll experience a quality of coffee potentially better than your local coffee shop!
Winner: Keurig
Nespresso models are certainly impressive, especially with its Aeroccinos that make real barista-style froth. Keurigs, however, simply have a greater range of machines available with very specific tasks that can be tackled. For instance, the Keurig K-Cafe, which tackles cafe-quality coffees and frothing, or the Keurig K-Duo, which makes carafes of coffee for groups of people to enjoy.
Â
Range of coffee pods
Nespresso’s range of coffee pods truly shines with its inclusion of the Nespresso Vertuo range. This gives an edge over Keurig in terms of the types of Nespresso capsules available to them, but the downside is that this new line of pods requires a Nespresso Vertuo coffee maker.
Keurig’s range of K-Cups definitely has the upper hand when it comes to brand power and variety, but each K-Cup is essentially designed the same.
Winner: Nespresso
The Nespresso Vertuo line takes the concept of variety to a different level by incorporating a completely different type of capsule altogether. If you’re lucky enough to have a Nespresso Vertuo machine, then you will have access to the original and Vertuo lines of capsules, allowing for a more diverse range of brewing.
Â
Price
Nespresso offers a large range of machines at different prices, and they often vary based on their size and additional features.
Keurig is similar in this way, as the price fluctuates between machines based on its reservoir size, core functionalities, and bonus features.
Winner: Keurig
At the end of the day, if you compare the Keurig equivalent of a Nespresso model, it’ll almost always come at a lower price point. As an example, compare the Keurig K-Slim with the similarly designed Nespresso single-serve Citiz, and you’ll notice a considerable difference in price with Keurig winning the battle of affordability.
Â
Brewing
Nespresso offers a more rich taste, utilizing a brewing method encapsulating fresh coffee grounds in an airtight pod. The coffee maker comes with two buttons known as “Espresso” and “Lungo,” the latter of which pours a larger ounce of coffee (though not a strong brew). As its name suggests, Nespresso is intended for primarily brewing espressos, and its new Vertuo line can do both espressos and regular coffee.
Keurig is primarily intended for brewing up regular coffees such as the Americano and is unable to do espresso brews. They are, however, designed to be compatible with hundreds upon hundreds of K-Cup brands, providing a far larger variety of flavors than Nespresso. Additionally, the Keurig K-CafĂ© model is a new machine range that actually brews both regular coffee and espresso, putting it on equal playing fields with the Nespresso Vertuoline.Â
Winner: Nespresso
 If you’ve read everything up till now, you would’ve noticed that despite Keurig having more sophisticated controls and interfaces, I always express how simple the design of the Nespresso is. Weighing up these two machines on an even playing field will likely result in a draw, so other factors must come into play. For me, Nespresso’s method of brewing coffee is just that much more simple, and even though it lacks some of the custom options that Keurig has, simplicity wins me over for this one.
Â
Environmental impact
Nespresso generally does not have the option of reusing coffee capsules available. However there are models few and far between that can make it happen, though only with the Nespresso Vertuo machines. Nevertheless, a Nespresso capsule is free of harmful plastics and made purely from recyclable aluminum, making them highly eco-friendly and sustainable.
Keurig provides reusable K-Cups so that you have the option of brewing your own grounded coffee beans using your Keurig machine, a concept that is still in the works for Nespresso. However, when it comes to recyclability, Keurig’s K-Cups are made of plastic which ultimately is harmful to the environment.
Winner: Nespresso
While Keurig has trumped Nespresso in providing reusable K-Cups, which in itself is an environmentally-friendly method of brewing, their regular pods are still made of plastic which has a larger carbon footprint. Comparing Nespresso to this, they use recyclable aluminum, which promotes eco-friendliness and sustainability.
Â
Coffee brands
Nespresso has a huge selection of compatible coffee pods, including their very own Nespresso Vertuo pods, L’or pods, Moccona pods, and even Starbucks pods. Each brand of capsules also has an extended range of flavors and blends, providing something for everyone.
Keurig is the brand powerhouse of American coffee making. Keurig brews are highly brand-based, meaning you have hundreds of coffee brands available to you, as there is a K-Cup for everything. Beyond just Starbucks, K-Cups provide access to Dunkin Donuts, McCafe, Tully’s, and Green Mountain brews, and that’s just naming a few.
Winner: Keurig
One cannot simply contend with the sheer variety of brands compatible with Keurig, and while this is more to do with the company being American-based and having access to a seemingly limitless amount of brews and blends, the fact of the matter is Nespresso simple does not have the same level of compatible brands to choose from.
Â
Beverage Variety
Nespresso allows you to make more than just espresso, including making hot chocolate, iced coffee, and other espresso based drinks. These drinks may include iced vanilla lattes, long blacks, or chai lattes.
Keurig machines brew coffee as well as hot chocolate but have the edge over Nespresso by also incorporating K-Cups from tea companies. The Keurig K-Cafe model also makes it possible to brew coffee shop-style cafe lattes.
Winner: Keurig
Both brands are extraordinarily well-versed in compatibility of many high-quality coffee beverages, but Keurig simply has the edge with its accessibility to the world of K-Cups. From tea brands to hot chocolates, and an endless amount of coffee flavors, Keurig is great for tea lovers as well as the everyday coffee fan.
Â
Cleaning
Nespresso’s coffee makers have a descaling mode which is quite simple to use. You simply hold the Espresso and Lungo buttons until they flash, then fill up the water tank with a descale solution and hit the Lungo button.
Keurigs often don’t have pod compartments, and in a way, their machines probably don’t need to be descaled as often as a Nespresso. In terms of the process, descaling a Keurig is more or less the same as Nespresso. For more details see our How to Descale a Nespresso post or how to descale a Keurig when the Keurig descale light stays on.
Winner: Keurig
While Keurig and Nespresso machines are relatively easy to clean and even have a removable drip tray each, the fact of the matter is that one of Keurig’s downfalls, which is their lack of pod storage, actually becomes a benefit when it comes to the self-cleaning cycle. This is because you don’t end up with a pile of empty K-Cups in your machine spreading coffee ground residue over time.
Â
Cost per cup
Nespresso’s original line can save you quite a lot per cup, as each capsule can be quite cheap depending on the variant. The Vertuo capsules are usually more expensive (here is the difference between Nespresso Vertuo vs Original).
Keurig’s single K-Cup is at an even lower price point than a regular Nespresso pod, and in general, the most expensive K-Cups are still cheaper than the cheapest Nespresso capsules.
Winner: Keurig
There’s no doubt that Keurig wins this bout, as they are cheaper than Nespresso in practically every way when it comes to cost per cup.
Shopping for your kitchen? Make sure to get our Kitchen Essentials List. It has over 200 items for your kitchen, from the appliances right down to the toothpicks.
Related:Â Keurig vs Ninja Coffee Makers
Â
Keurig vs Nespresso FAQ
Does Keurig or Nespresso make better coffee?
Keurig typically makes better regular coffee while Nespresso makes better espresso, though this is more of a consensus figure rather than a concrete fact.
Â
Why is Nespresso so much better than Keurig?
Nespresso is superior to Keurig when it comes to pod storage, recyclability, and richer espresso-style coffee. To say they are better than Keurig overall would be a subjective statement.
Â
Can you use Nespresso pods in a Keurig?
No, Keurig is not compatible with Nespresso pods, and vice-versa, Nespresso is not compatible with K-Cups.
Â
Are Nespresso pods the same as K cups?
No, Nespresso capsules are made using recyclable aluminum in airtight capsules while Keurig K-Cups are made using plastic and aluminum.
Â
What’s the difference between Keurig and Nespresso?
The major difference is that Keurig specializes in regular coffee brewing using K-Cups while Nespresso specializes in rich espressos using Nespresso capsules/pods.
Â
Is Nespresso as good as real espresso?
Yes, Nespresso is designed for the sole purpose of giving you the fresh ground coffee experience of a high-quality espresso.
Â
Why does Nespresso taste so much better than Keurig?
Due to its richer flavor and aroma, often resulting in a strong coffee, some may prefer the taste of Nespresso to Keurig, though it comes down to personal preference.
Â
Which is better, Keurig or Nespresso milk frother?
Nespresso’s Aeroccino milk frother is generally easier to use, as it heats milk with the push of a button. Keurig usually doesn’t offer milk frothers apart from its K-Cafe range.
Â
What is the difference between a Keurig and an espresso machine?
Keurig machines brew quality coffee using K-Cups to make regular single-serve coffee while an espresso machine dispenses shots of espresso.
Â
Can you make espresso in a Keurig?
Some later models such as the Keurig K-Cafe can make regular coffee as well as brew espresso.
Â
Does Nespresso taste better than Keurig?
If you prefer richer, or a stronger coffee such as an espresso, then you’ll prefer the taste of Nespresso over a Keurig. If you’re a fan of Americanos, then the Keurig will likely taste better for you.
Â
Which is better Keurig or Nespresso
Going through each component of the Keurig vs Nespresso, the clear cut winner between the battle must be Keurig, with 8 wins to 4 in its favor. Despite the overwhelming victory to Keurig, each feature was extremely close and could have gone either way, so don’t count Nespresso out just yet.
The points that Nespresso won were definitely steamroll wins, from its storage to its impact on the environment, I almost wanted to give them 2 points each for these wins. Nevertheless, a winner must be decided, and Keurig has proven to have the upper hand in the features that matter most (at least to me). From its coffee machine range to its brand power, and down to its cost per cup, the winner goes to Keurig!
Â
Click here to see the best Keurigs coffee makers.
Click here to see the best Nespresso coffee makers.
Â
You + Sharing This = Us as Best Friends
less- Product-Reviews |
- coffee |
- Keurig |
- Nespresso